Google Ads Remarketing Tags – The How To Guide
- November 25, 2022
- Digital Marketing, Google, Inbound Sales, Sales
What are Google Ads Remarketing Tags?
A Google Remarketing Tag is used to reach out to customers who have browsed your website. After tagging a page on your website, a remarketing list of customers who have visited the page is generated. Businesses can then build remarketing campaigns targeted at this remarketing list of customers when they search on Google.
Why use Google Ads Remarketing?
There’s evidence to suggest that only 2-4% of site visits result in transactions.
Stats like that can be scary.
Or they can be the motivation you need to fuel your marketing efforts.
There are a number of ways to not only get customers to your site but to also persuade them to take action.
Remarketing campaigns are designed to display ads to potential customers who visited your site or used your mobile app.
It’s an effective technique that allows you to stay connected to your target audience while also building brand awareness.
Lucky for you, there are a number of tools and strategies to help you with your remarketing efforts, from generating a Smart List to creating a custom audience using a Facebook pixel.
In this post, we’re going to focus on how to bring potential customers back to your site.
We’ll go through how you can set up a Google remarketing campaign and also how you can take advantage of the several networks they offer, so that you can achieve maximum reach to your target audience.
The different remarketing campaigns
Because we’re talking about remarketing using AdWords, there are a variety of ways you can reach your target audience through a display ad.
You can use the following platforms/networks –
- YouTube
- Gmail
- Apps
- Display Network
- Remarketing Search Listings Ads
We’ll briefly go through how you can set up a campaign for each platform. Keep in mind that it is obviously easier to remarket on some networks than it is on others.
A display network ad is simpler to create than a YouTube Video Ad, for example.
Also note that ‘Remarketing search listings ads,’ technically don’t count as ‘retargeting,’ in the eyes of Google.
But, they’re still relevant to what we need to cover.
Understanding your remarketing goals
In general, there are three kinds of remarketing campaigns that you might want to run.
- Campaigns aimed at people who did not take a certain action on a page – e.g. Generating leads from those who did not opt in on your landing pages.
- Campaigns aimed at people who reached a certain page within your checkout process, but did not complete their purchase– e.g. Converting people who abandon carts.
- Campaigns for people who have not seen a page that you’d like them to see –e.g Promoting content or other pages on your site.
It is important that you know exactly what action you want your potential customer to take when exposed to your remarketing campaign.
When you know that, you can then go about the following –
- Deciding which pages should contain your remarketing tags.
- Choosing a network and deciding how to reach your target audience on that network.
- Understanding how to create ads tailored to your target audience.
- Creating custom pages dedicated to the audiences that you’re remarketing to.
Having knowledge of how you’re going to tackle each of these details is essential if you want to achieve optimal results with your remarketing campaigns.
Google Remarketing Tag Setup
Google Tag Manager Support can be found here if you don’t like our blog…
Setting Up Steps
Step 1. Complete initial Google Ads account setup
If you have already set up your Google Ads account, you can go directly to Step 2.
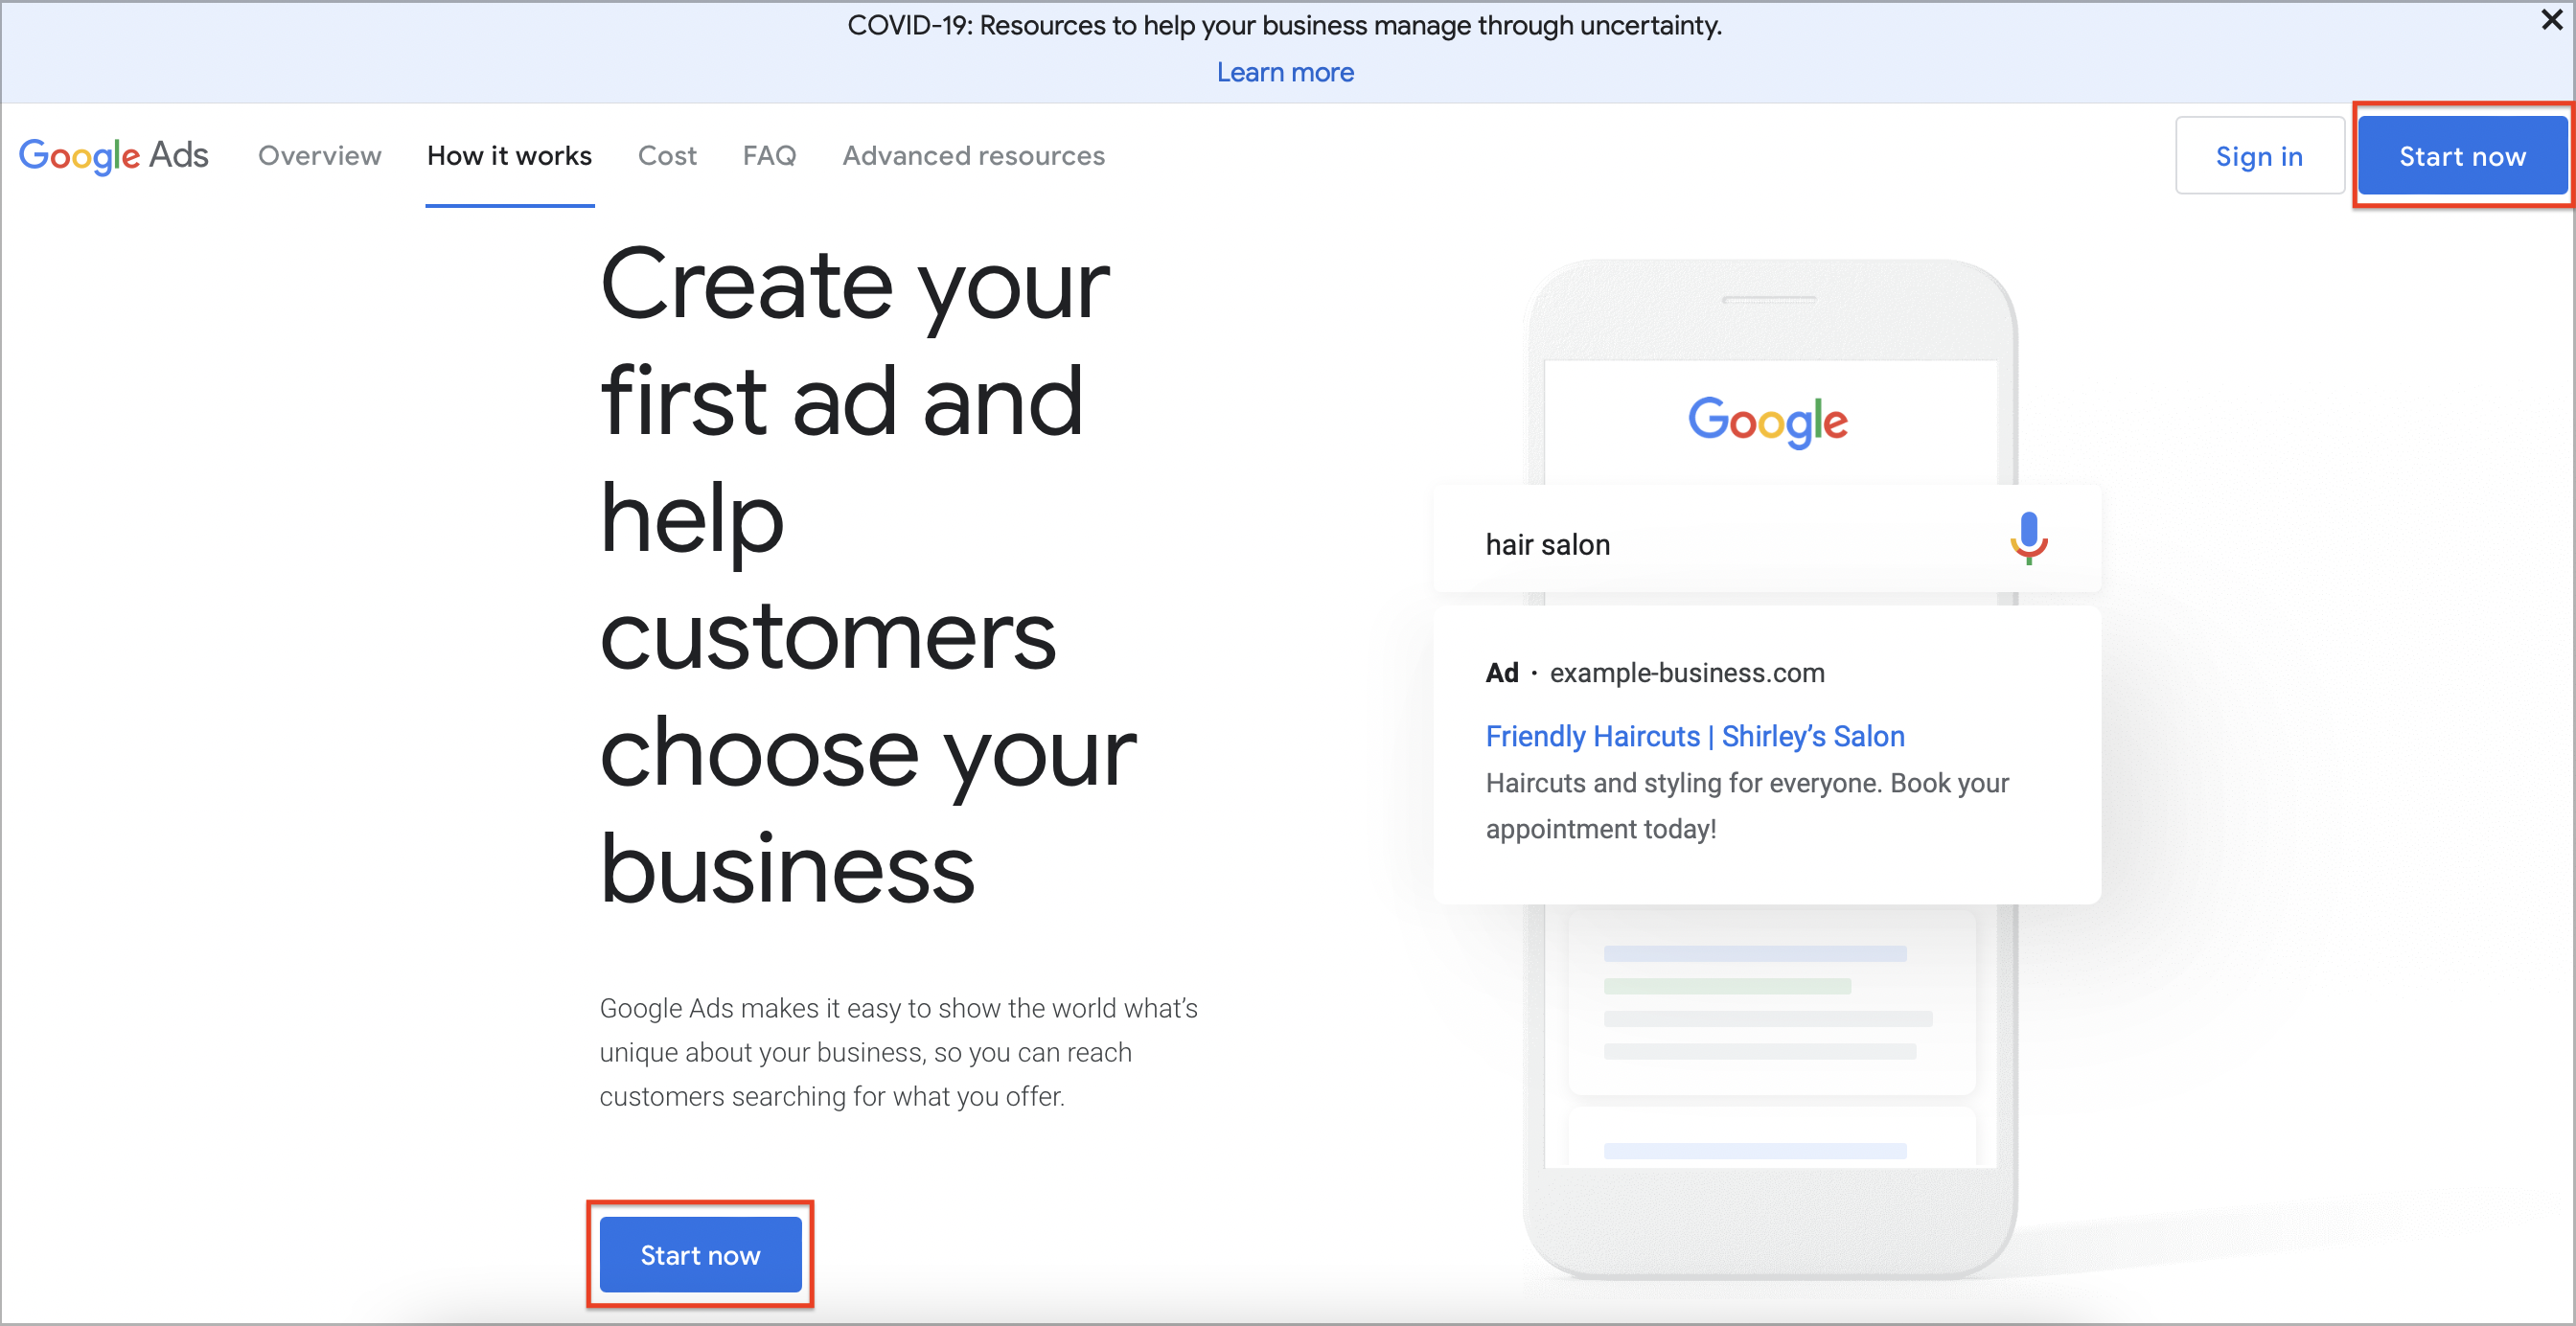
If this is your first time using Google Ads, please go to Google Ads and click Start now to sign in with Gmail to complete the initial account setup. The initial settings include the account name, payment method, and the first advertising content. After completing the initial setup, you can pause the advertising campaign that you just set to stop running.
Step 2. Set up audience sources
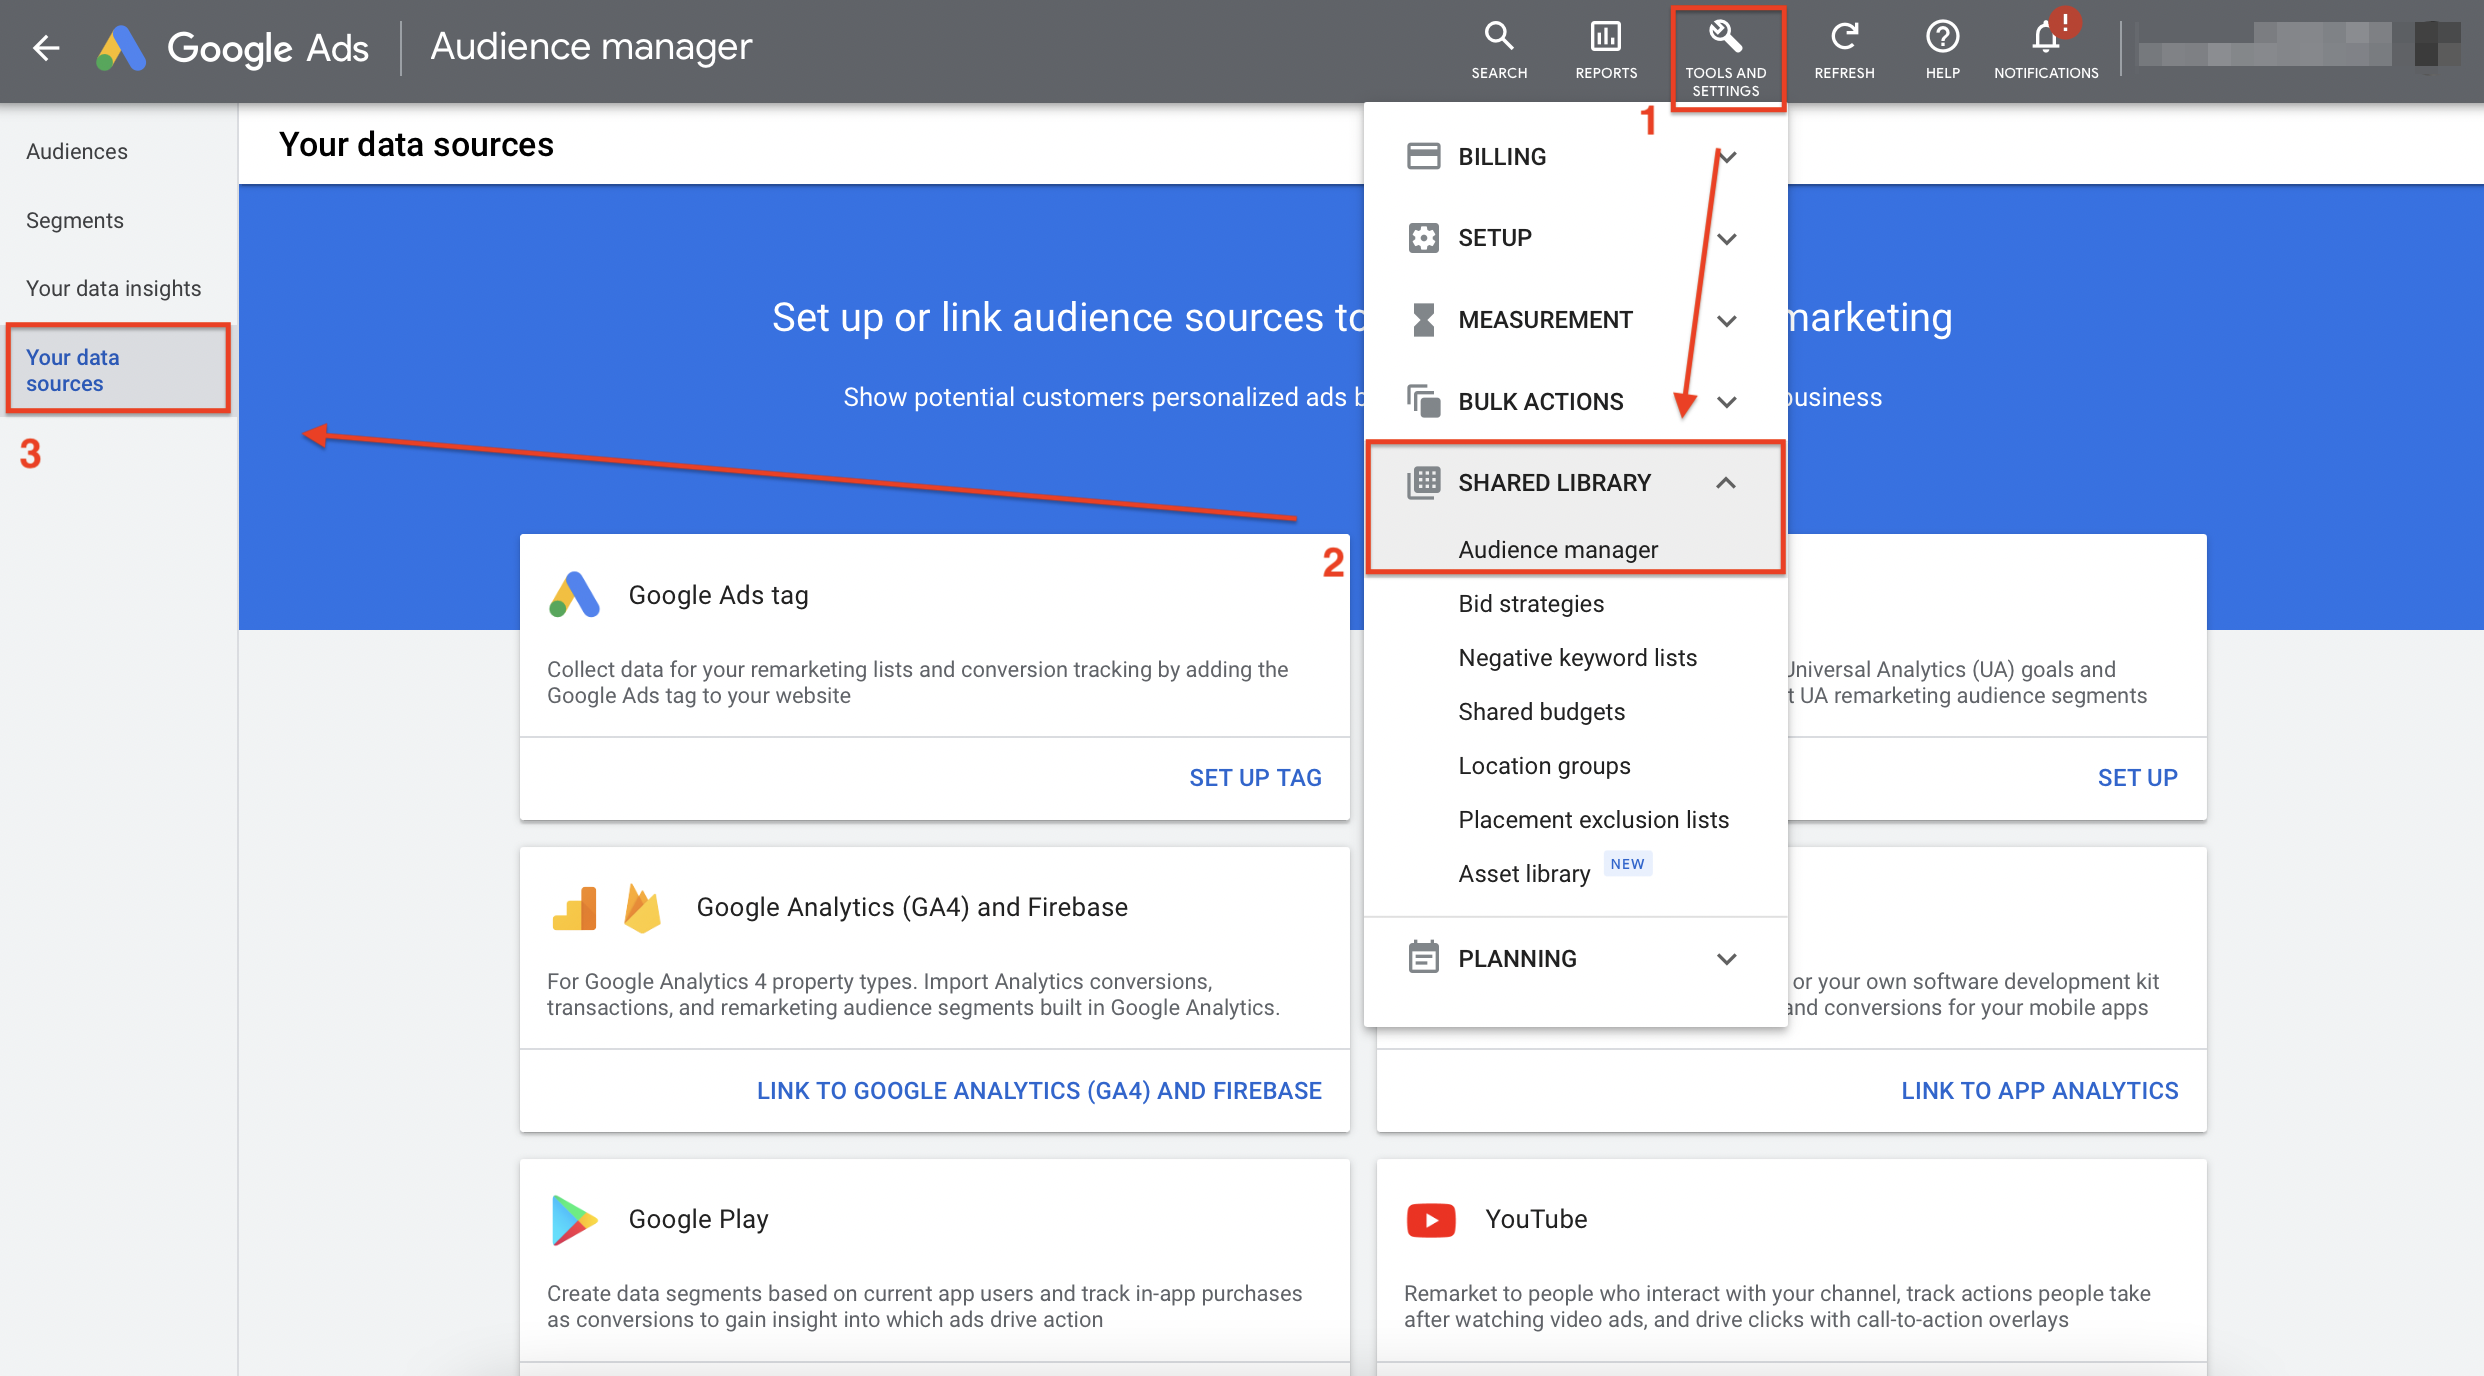
Click [Tools & Settings] > [Audience manager] > [Your data sources].
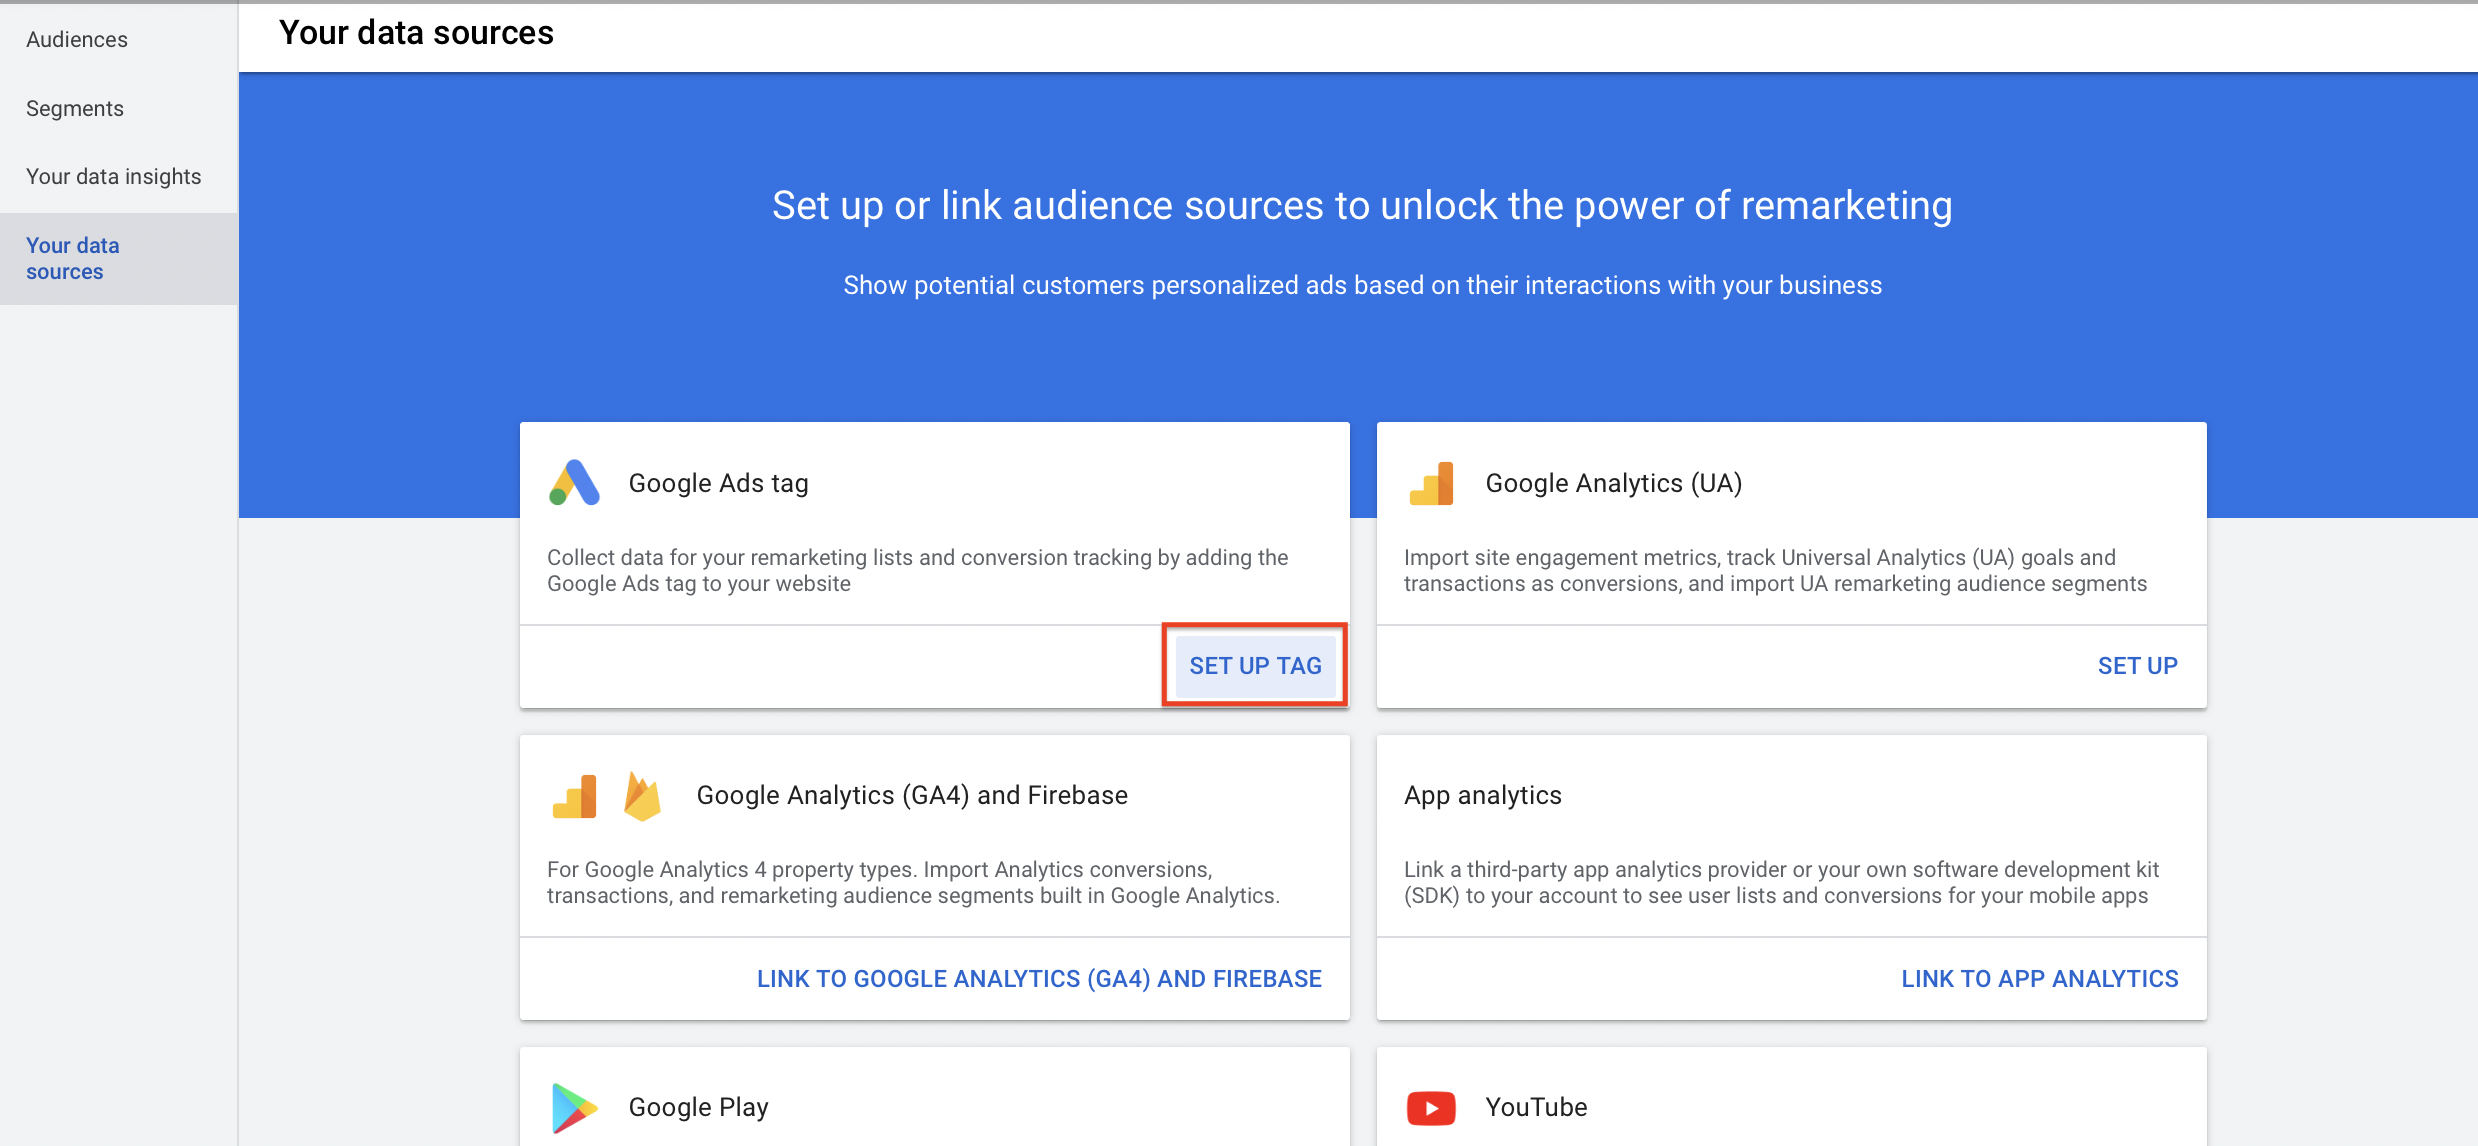
After entering the page, click SET UP TAG in Google Ads tag column.
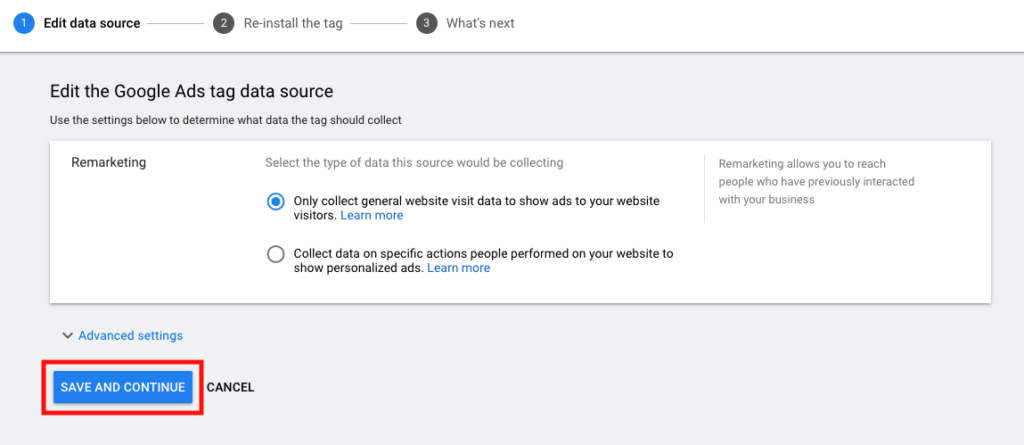
Step 3. Edit data source
Please select the first option “Only collect general website visit data to show ads to your website visitors” and click on the SAVE AND CONTINUE.
Step 4. Tag Set up
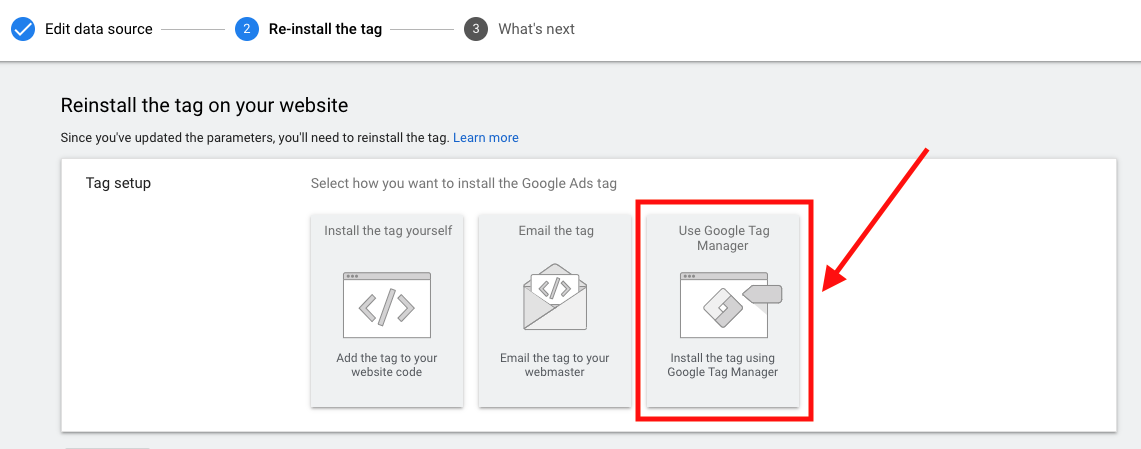
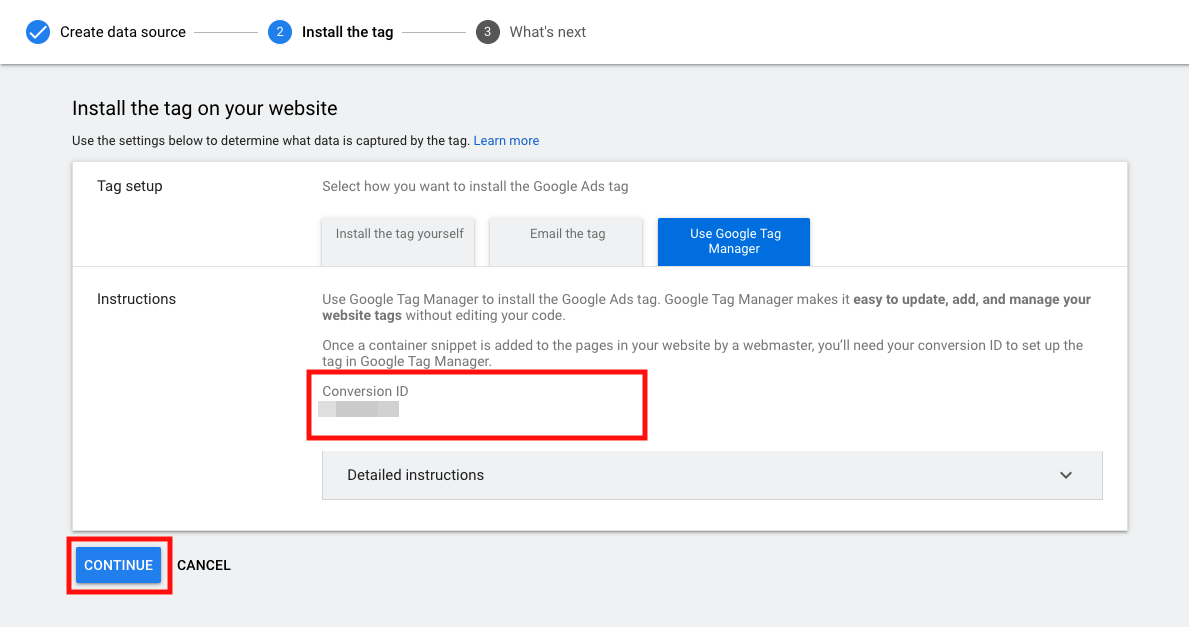
Click Use Google Tag Manager and copy the “Conversion ID”. Click CONTINUE.
Step 5. Tracker Settings
Go into your SHOPLINE Admin, then add a Google Remarketing Tag in [Marketing & Tracker] > [Tracker Settings] > [Google Remarketing Tag].
Pick an action to track and paste the Google Conversion ID. Don’t forget to click Add to save your tracker! 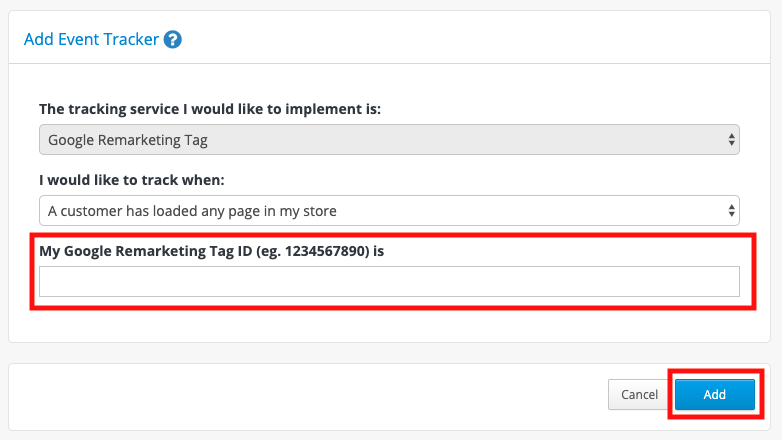
Step 6. Done
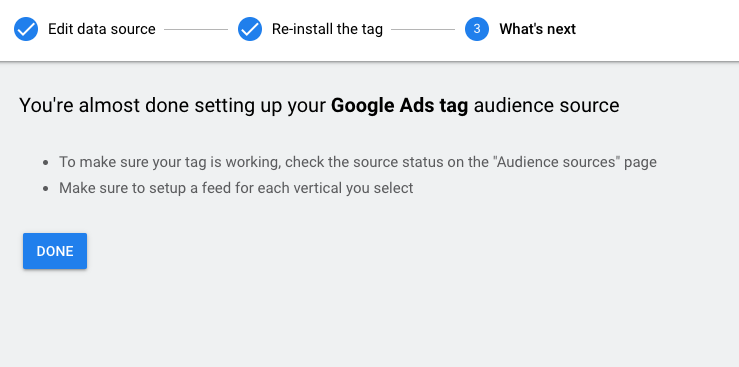
Go back to the settings page of Google Ads and click DONE to complete the installation!
That is how you set up a Google Ads Tag… and now let me show you how it can be used in a Google Ads Remarketing Campaign.
How to Set up a Google Ads Remarketing Campaign
There are three core components of setup required to create and activate a remarketing campaign for your Google Ads account.
- Create an audience to remarket to. Called a “remarketing list,” this audience is essentially a collection of users who qualify to be served your remarketing ads based on requirements you set.
- Create a remarketing campaign within your Google Ads account. Creating this kind of campaign is similar to a standard campaign set up.
- Create and/or upload display ads that consist of a series of text and images to your created campaign.
Let’s dive into each of these steps in more detail.
1. Create a Remarketing List in Google Ads
If this is your first time remarketing, you will need to add a remarketing tag to your website. This small snippet of code allows visitors to be tagged with a cookie, so your remarketing ads will be shown to them once off your website. Once you have this tag active, you will be able to create remarketing lists.
After logging into your Google Ads account, click “Tools & Settings” in the upper navigation bar and select “Audience manager.”

Once you are in Audience manager, make sure you are in the remarketing section under “Audience lists.” Now click the + button and select “Website visitors” from the drop-down.

Give the audience a name. I recommend the name to include the word “remarketing” and whom you are targeting from the tag (ex. Remarketing – All Visitors). Then under “List members,” select “Visitors of a page.”
Under “Visited page,” select “Match any rule group.” And below that, the first option should be “Page URL,” and then the second option should be “contains.” Enter the URL that you want to retarget, whether that is your whole website or a specific landing page. You then have the option to pre-fill your list with users who have visited your website or page in the past 30 days, or you can start with an empty list.
Under “Membership duration,” you can choose how long someone stays on this list (how many days you will remarket to them after they have visited your website). I recommend 30 days as a good length of time to remarket to someone.

Click the “Create Audience” button at the bottom of the page, and your audience has now been created.
Once your list is created and the remarketing tag is implemented on your site, an audience list size will begin to populate.
2. Create a Remarketing Campaign in Google Ads
Once your remarketing list has been created, it’s time to turn your attention to building the remarketing campaign in Google Ads.
Start by navigating to the “Campaigns” tab of your Google Ads account and click the + button and select “New campaign.”

Choose “Create a campaign without a goal’s guidance.” Below that, under “Select a campaign type,” choose “Display.” You will be presented with three choices for a display campaign; you want to select “Standard display campaign” and click “Continue.”
Walk through the guided process to complete your campaign setup.
Once you have gone through the basic campaign settings, under “Create your ad group,” give your ad group a name.
Under Audiences, click on “Browse,” and then click on “How they have interacted with your business,” and under “Website visitors,” find the audience you just created earlier and select it.

3. Create Ads for Remarketing
Before moving forward on adding your image ads into your campaign, make sure all the banner ads you have are formatted and sized within Google’s ad requirements.
You have three options to create your ads:
- Responsive display ads
- Upload display ads
- Copy existing ads
Responsive display ads are great for anyone who doesn’t have access to a graphic designer. It’s an easy way to create display ads, and Google will retrofit your ad in most sizes for you.
Otherwise, you can upload existing banners to run them as ads. We recommend uploading a variety of different sizes, so you can get as many placements as possible. You would choose this option over responsive display ads because you want control of the appearance of your ads.
Once your ads are created or uploaded, click “Add To Ad Group.” Then click on “Create campaign.”
Please keep in mind that when adding images, Google usually puts those through a review process. During that review, your ads will not be eligible to show. Typically that review process is no more than 24 hours long.
That’s it! After creating your remarketing list, remarketing campaign, and creating and/or uploading your content, your campaign is all ready to serve ads to your target audience.
The Serial Seller Conclusion
There’s a good chance that your business will benefit from remarketing.
Having a goal for your campaign is a great way to focus your efforts and ensure that you get the best possible results.
And hopefully, after reading this post, you’ve seen just how many remarketing options are open to you.
Don’t use remarketing campaigns on your website until you have 1,000 visitors as you want to make sure your budget counts. Additionally, you can use remarketing campaigns as “automated follow ups” to push prospects through a funnel by serving different ads to the prospect at different stages of the sales cycle.
In any case, pick one goal and run a remarketing campaign in the hopes of achieving it. Then, when you have some experience, branch out and try some more adventurous campaigns.
Book a call with us now If you need help with remarketing campaigns on Google!
About us and this blog
We are a Full-Service Sales & Marketing provider that aims to help small to medium businesses increase their leads and sales while helping remove the business owners from their day-to-day activities so they can focus more on the long-term goals of their business.
Book a Meeting with us!
We offer Done-For-You Sales, Sales Coaching, and Advisory as well as Digital Marketing Services. If you want to increase the leads generated for your business and need some guidance and accountability, book a call with us now.
Subscribe to our newsletter!
More from our blog
See all postsRecent Posts
- How to Protect WordPress Website from Hackers April 24, 2025
- How to Change WordPress Admin Password April 24, 2025
- How Much are Meta Ads April 17, 2025





Pingback: Google Ads Bidding Strategy - Don't Know What You're Doing?