Why Yoast SEO Is the Most Popular WordPress Plugin
- December 2, 2022
- Digital Marketing, Inbound Sales, Search Engine Optimization (SEO), Wordpress
Yoast SEO WordPress Plugins…? What is Yoast? What does it do? and Why do so many people use it with WordPress?
Every WordPress site needs a Search Engine Optimization (SEO) plugin. This is how you’ll stand a chance of getting your pages to show up in search engine rankings. And when it comes to SEO plugins, Yoast SEO is by far one of the most popular options. However, WordPress SEO is unavoidably a complex topic.
Fortunately, to address that, Yoast SEO has plenty of built-in features to give you pinpoint control over your site’s SEO. Plus, we’re here to guide you through all the main sections to make SEO a little less daunting.
Higher Ranking Sites
WordPress is one of the best content management systems for SEO. But even though it gets a lot right “out of the box,” there’s much more that you can do to improve your performance. It’s time to focus on WordPress SEO!
Optimizing your site using the tactics and best practices outlined in this article will help you improve your rankings, gain more subscribers or sales, and have a better website.
Because you should ingrain proper SEO in all aspects of your online marketing and PR, this guide covers quite a lot of ground! It’s a long read, so feel free to use the table of contents below to jump around.
Before we Start
This article assumes that you’re using our Yoast SEO plugin, which adds more features and SEO tools to WordPress. If you’re not already using it, you can set it up right away with our beginner’s guide to Yoast SEO. Please check out the Yoast SEO for Shopify app if you are running a Shopify online store.
Most of the principles will still apply if you’re using another SEO plugin. Of course, we’d prefer you to switch over and use our powerful WordPress SEO plugin, which is why we’ve written a migration guide for you. It’s a straightforward process!
Setting up and using Yoast SEO
When you’re working with a self-hosted WordPress site, the Yoast SEO plugin is one of the most valuable tools you can have. Yoast SEO is one of the most widely popular WordPress plugins around and it’s easy to understand why. Whether you’re running a personal blog or you’re a SEO professional managing a website for a client, Yoast is a powerful tool that can help you make your site as search engine-friendly as possible.
Yoast SEO can be installed on any self-hosted WordPress site. (Sorry, free WordPress.com bloggers.) It’s easily the most comprehensive SEO-related WordPress plugin you could ask for and best of all, it’s free! You do have the option to buy premium Yoast SEO extensions for some extra functionality, but its most important functions are part of the free plugin. Yoast makes it easy for you to do things like control titles and meta descriptions, set your targeted keywords and track how often you’re using them, manage sitemaps, and so much more.
Downloading and installing Yoast SEO
If you don’t already have the Yoast SEO plugin installed on your site, let’s take care of that. If Yoast SEO is already installed and set up and you just want to learn more about how to use it, feel free to scroll on down to the “Using Yoast SEO” section.
From your site’s admin dashboard, look along the left-hand side of the screen for the “Plugins” option. When you hover over it, you’ll see the “Add New” option.
Click on “Add New” and you’ll be brought to a page with a selection of featured, popular, recommended, and favorite plugins. If you don’t see Yoast SEO listed under any of these sections, there’s a search box you can use to find it.
Once you find the Yoast SEO plugin, click “Install Now” and WordPress will download it, install it, and ask you to activate the plugin. Activate the plugin and if it’s been successfully installed and activated, you’ll see an option marked “SEO” on the left-hand sidebar menu of your admin dashboard and along the horizontal menu bar on the top of the screen.
Downloading and installing Yoast SEO was easy, but now that you’ve done that, you need to set up the plugin. If you’ve never used Yoast SEO before, this might seem a little overwhelming, but I promise it’s nothing you can’t handle. I can’t promise this process will be a non-stop, action-packed thrill ride, but it’s completely worth the time it takes to set it up properly. Since the ideal Yoast settings will vary from site to site, I’m not going to tell you any hard and fast settings to choose, but I will walk you through what each of the settings are.
Setting up Yoast SEO
If you don’t have any settings to import, let’s start from square one. Even if you imported your settings from another plugin, there’s no harm in checking all these settings just to make sure everything is correct.
To get started, go to your site’s admin dashboard, find the “SEO” option on the left-hand side menu (or the top menu, whichever you prefer) and click on “General.” This will bring you to a page where you’ll have the chance to set up some basic global SEO options for your site.
General settings

General
If you ever want to revert Yoast SEO to its default settings, the “General” tab is where you can do that. Unless you want to take the introductory tour, head on over to “Your Info.”
Your Info

Here, you’ll be able to tell Yoast what your site’s name is or if you have an alternate name you’d like to use. You can also tell it whether or not you are a company or a person, which will make it easier for Google to incorporate your site in Knowledge Graph results. If you’re setting up Yoast SEO for a company’s website, you’ll have a chance to add things like a company logo, which could also be included in Knowledge Graph results.
Webmaster Tools

Now, let’s head on over to the “Webmaster Tools” tab. If you plan to use tools like Google Search Console, Alexa, Bing Webmaster Tools, or Yandex Webmaster Tools, you can verify your site through here if your site isn’t already verified.
The basic process to do this is pretty similar no matter which of the tools you’re using, but I’ll use Google Search Console as an example:
- Open your Search Console dashboard and select “Manage Property,” then “Verify this site” from the box next to the site you’re adding Yoast to. If you haven’t already added your site to Search Console, you’ll need to do that first. (Check out my guide on the basics of Google Search Console if you need help with that.)
- Choose the “HTML Tag” verification option. Instead of pasting the code it gives you into the <Head> section of your site’s code, take that code and paste it into the Google Search Console box you see here and delete everything except what’s inside the quotation marks, including the quotation marks themselves.
- Hit “Save Changes,” then go back to your Google Search Console dashboard and hit “Verify.” You’re all set!
Security

Lastly, there’s the “Security” tab. If you’re working with a single-author site, you don’t really have anything to worry about here and you can leave this box unchecked. But if you’re working with a site where multiple authors can access the site and add content, this section can be helpful. When this box is left unchecked, it will allow a section with advanced options like redirects and noindex settings to be visible in the Yoast toolbox that appears on each page’s page editor. Although you might be fine with your site’s contributors being able to add content on their own, you might not necessarily want them to change those sorts of settings. All you have to do is check this box and you won’t have to worry about it.
Titles & Metas
Next, let’s move on to the “Titles & Metas” section, which can be found under the “SEO” option on the left-hand side menu. This section is hugely important for SEO purposes since it’s where you get to have some say in how your site appears in SERPs. When you click on this, the first thing you’ll see is the “General” tab.

General
Here, you’ll have the chance to change how your titles display, like “Your Site Name | Contact Us” or “Your Site Name – Contact Us.” Whichever title separator you choose to go with will be used on all pages of your site. As for the “Force rewrite titles” option, this corrects a problem some sites have where the site name appears twice within the title. Some sites use WordPress themes that have built-in SEO title displays, which can override the settings you choose in Yoast. If you’re having this problem, checking this box can help solve it. If you check this box and you’re still having the duplicate title problem, contact your web developer because there is a way to fix that by editing your site’s code.
Homepage

What you see under the “Homepage” tab will depend on how your site is set up. In this case, the site I’m working with is set to use one page for a homepage and a different page for the blog. If this is how your site is set up and you wanted to make changes to the titles and meta descriptions for either of those pages, all you’d have to do is click on the “editing the front page/blog itself” links seen here and make your changes. If you’re working with a site where the homepage just displays the latest posts, your “Homepage” tab will look differently from what you see here.
Post Types

Titles and meta descriptions
Next up is the “Post Types” section. Here, you can set up basic templates for the titles and meta descriptions for the main types of pages of your site. Blog posts could follow one format, while other pages on your site follow another. If you don’t specifically write an SEO-optimized title or meta description for each of your pages, your titles and meta descriptions will follow the basic template you establish here. You can fill these out using variables and the information you specify will automatically be inserted into your titles and meta descriptions. If you leave the meta description box blank, search engines will pull an excerpt of content from the page.
Meta Robots
With the “noindex, follow” option, check the box if there’s something you don’t want to be indexed by search engines. In most cases, you’ll probably want to leave this box unchecked. But if you have pages you want to keep out of search engines or pages that could lead to duplicate content penalties, such as archives of content, go ahead and check the box.
Date in Snippet Preview
As for the “Date in Snippet Preview” option, whether you should check this box or not all comes down to what kind of content you have on that type of page. If you’re making frequent blog updates or are posting content about lots newsworthy stories, you might want to enable this. But if you’re dealing with evergreen content that will be relevant for years to come, you might prefer to disable this so people won’t see your page in SERPs, notice the date, and assume your site is out of date.
Yoast SEO Meta Box
Then there’s the option to hide the Yoast SEO Meta Box. If you’re dealing with a site that has multiple contributors, you might want to use this option to prevent your contributors from being able to change those. If you check this box and later decide you want this option back, no big deal; you can always come back later and change this setting.
Taxonomies

Next is the “Taxonomies” tab. If your site is something like a blog that uses several different categories and tags to organize posts, you can use this section to set up title and meta description templates for those pages using variables just like you did in the “Post Types” tab. If you tend to use the exact same terms for tags and categories, that’s fine, but you might want to check the “noindex, follow” option to avoid being penalized for duplicate content.
Archives

When you run a blog, having pages of archived content based on date and/or author is a great way to make it easy for your readers to find past content. However, archive pages aren’t always so convenient for search engines, which might consider them duplicate content. The “Archive” tab lets you prevent that by telling them whether or not you want your archive pages indexed or not, or you can disable archive pages all together if you prefer.
You’ll also be able to set up titles to appear on special pages like 404 pages. So if you’ve got something special you’d like these to be, go ahead and enter them in the “Special Pages” section. You can even use some of those variables you used in the past couple of tabs if you want.
Other

Finally, we come to the “Other” section, where you can set a couple more things. Fortunately, Yoast does a nice job of explaining what each of these settings are, so this is a pretty straightforward section.
Congratulations — you’ve made it through the most time-consuming part of the settings! There are still more settings to take care of, but the good news is the rest of the settings from here on out are pretty simple. Let’s get to work on the “Social” section, found under the “SEO” option of the left-hand toolbar.
Social

The “Accounts” tab of the “Social” section is pretty self-explanatory. All you have to do is add the URLs to each of your social media profiles. Just remember that for the Twitter section, you only have to enter your username, not the URL for your profile. Filling this section out notifies search engines that they are associated with your site.

As you go through the tabs for individual social media platforms, you’ll be able to control how content shared from your site will appear on each platform. Under the “Facebook” tab, there’s the option to add Open Graph meta data to your site’s <Head> section, which will make it easier for Facebook to use an appropriate image, title, and description when something on your site is shared. You can also specify a default image for them to use if someone shares a post or page that doesn’t already have an image on it.
If you have a Facebook fan page for your site, you can specify an admin for your page so you’ll be able to access Facebook Insights for your site. Facebook Insights will give you information about how often things from your site are being shared, being “liked,” and how much traffic your site is getting from Facebook. To access Facebook Insights, click on the “Facebook Insights” link and look in the upper right hand corner for a button marked “Insights for your Website.” This will bring up a box for you to connect your site’s domain to Facebook Insights.
There are similar settings under the “Twitter,” “Pinterest,” and “Google+” tabs. Under the “Twitter” tab, you can set up Twitter card meta data, which is basically the Twitter equivalent of Facebook Open Graph. If your site has a Pinterest account, you’ll need to check the “Add Open Graph meta data” box under the “Facebook” tab first, then enter the verification code provided to you by Pinterest under the “Pinterest” tab.
Now that your social media settings are all set, go back to the “SEO” section of the left-hand side menu and choose “XML Sitemaps.”
XML Sitemaps

One of the best things about Yoast SEO is that it makes managing sitemaps very easy. When you enable XML sitemap functionality, Yoast SEO automatically generates a sitemap, updates it as you add new content, and pings search engines when it’s updated.
As you click through the various tabs in this section, you’ll have the chance to determine whether or not you want things such as specific types of posts or post categories included in your sitemap. Just look through the tabs and if you see something you don’t want in your sitemap, simply check the box next to it and you’re good to go. You can also exclude specific posts from sitemaps by entering the post ID numbers under the “Excluded Posts” tab.
Now, let’s move on to the “Advanced” option, found under the “SEO” section on the left-hand side menu. Don’t let the name mislead you; this section is actually pretty simple.
Advanced
Breadcrumbs

Under “Advanced,” the first tab you’ll see is “Breadcrumbs.” If you enable breadcrumbs on your site, your visitors will see links along the top of the page showing the path that leads to the current page. (Example: Site Name > Blog > Post Title). Breadcrumbs can also be visible in SERPs, like so:

If you want to have breadcrumbs on your site, unfortunately, it’s not quite as simple as checking this box. Be sure to check out Yoast’s article on implementing breadcrumbs because you’ll also need to add some code into your theme. If you aren’t able to edit your site’s theme on your own, talk to your web developer about adding this code to your site.
Permalinks

Let’s move on to the “Permalinks” tab. Here, you can clean up your URL structure, permalinks, and <Head> section to make them a little more search engine-friendly. Yoast does a good job of explaining what each of these options are, so there’s no need for me to make this guide any longer than it already is.
RSS

Next is the “RSS” tab. If you’ve been blogging long enough, there’s a good chance that at some point, you’ve found out that a scraper has published some of your content word-for-word on another site without your permission and without attribution. It’s annoying, right? You might not be able to completely prevent your content from being scraped, but you can use this section to add content to your posts when they appear in RSS feeds, giving yourself credit and linking back to your site. That way, if a scraper steals content directly from your site’s RSS feed, you at least get credit and backlinks to your site.
Search Console
Now we’re down to one last big setting to take care of, but this one only applies if you use Google Search Console. From the “SEO” option on the left-hand side menu, click on “Search Console.”

Here, you’ll be able to get a verification code so you can connect Yoast to Google Search Console. Doing this will let you see a list of site errors that your site’s visitors have encountered and give you a chance to fix them right from your site’s dashboard. If you need to set a redirect for a broken link, you can do that there, too.
If you want to do this, all you have to do is:
- Click on “Get Google Authorization Code.” This will bring up a box asking you to give Yoast SEO access to your Search Console account.
- Hit “Accept” to get a code to paste into the “Authenticate” box you see here.
- Click on “Authenticate” and choose your site’s profile from the list provided.
- Hit “Save Profile.”
That takes care of all the major settings. Finally! Before we move on, there’s one last thing I want to show you. Go back to the “SEO” option on your left-hand side menu and click on “Tools.”
Tools
The “Bulk Editor” tool is something you hopefully won’t have to use too often, but if you ever need it, you’re going to love having it. If you ever find yourself needing to make changes to several titles and/or descriptions at a time, you can use it to bring up a list of all your posts and pages so that you can simply go through and make all your changes at once, instead of going to each individual page and making your changes there.
There’s also the “File Editor” tool, where you can make changes to your robots.txt file and your .htaccess file. Last, but certainly not least, there’s “Import and Export.” Now that you’ve spent all that time getting all these settings just right, you might want to export your settings so you can have a backup copy. Or if you have other sites to install Yoast SEO on, you can always export your settings and import them to other sites if you like.
Using The Yoast SEO Meta Box
On a day-to-day basis, the Yoast SEO meta box is where you’ll interact with the plugin the most. The meta box helps you by:
- Analyzing your content for its SEO quality and readability
- Letting you configure settings for how your content functions in Google and social media
The meta box appears underneath the WordPress editor (its exact location depends on your other plugins and themes):
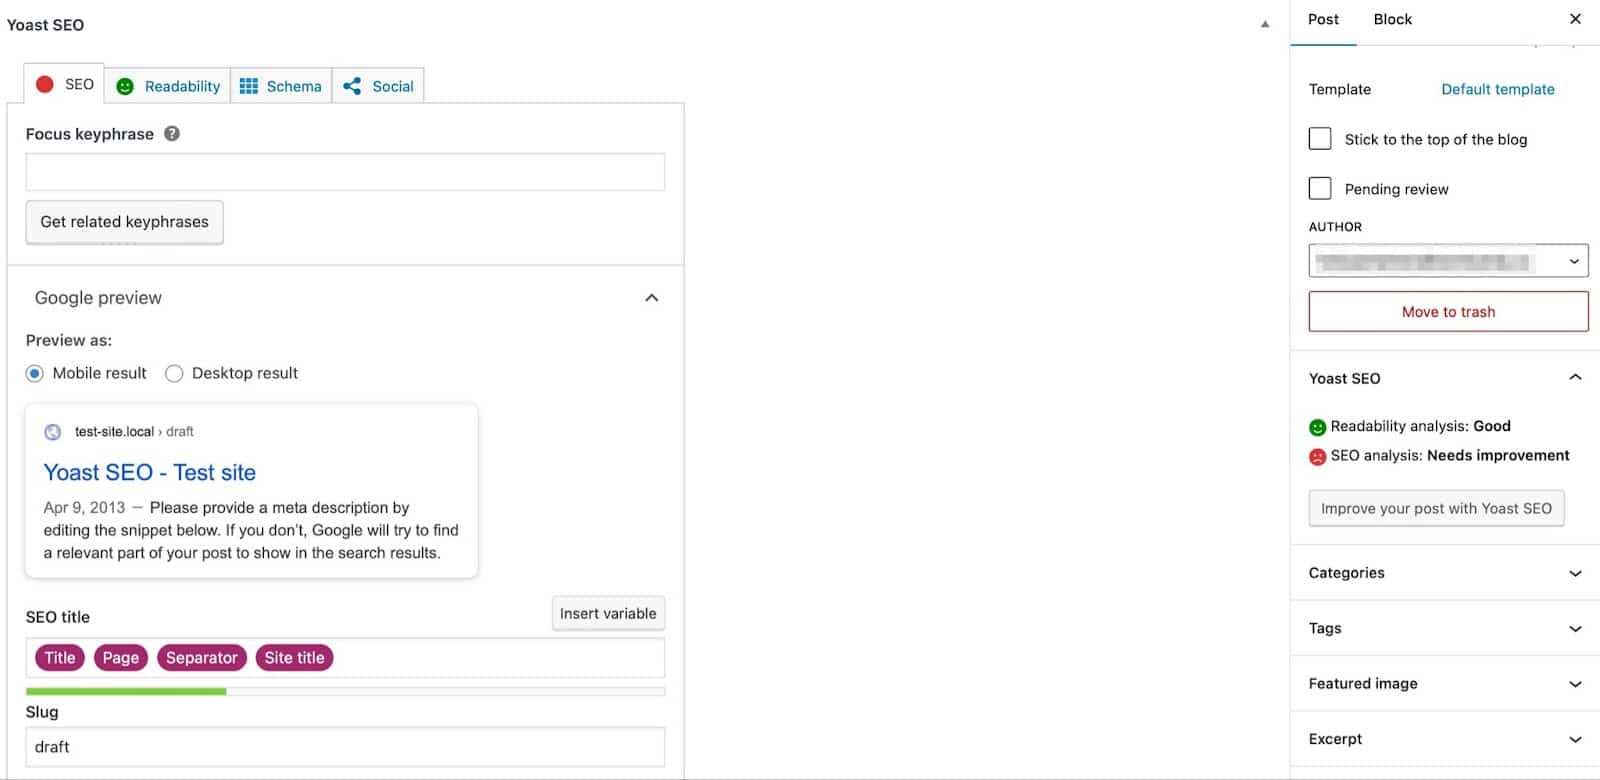
If you’re using the new WordPress block editor, you can also find this section in the right-hand sidebar.
The SEO Tab
The SEO tab is mostly about how well-optimized your content is for search engines.
The first area in the content optimization tab is the Focus keyphrase. Essentially, you’ll want to perform some basic keyword research to find a keyword that people are searching for.
Then, you plug that keyword into this box and Yoast SEO will analyze your content to see how well-optimized your post is for that specific keyword:
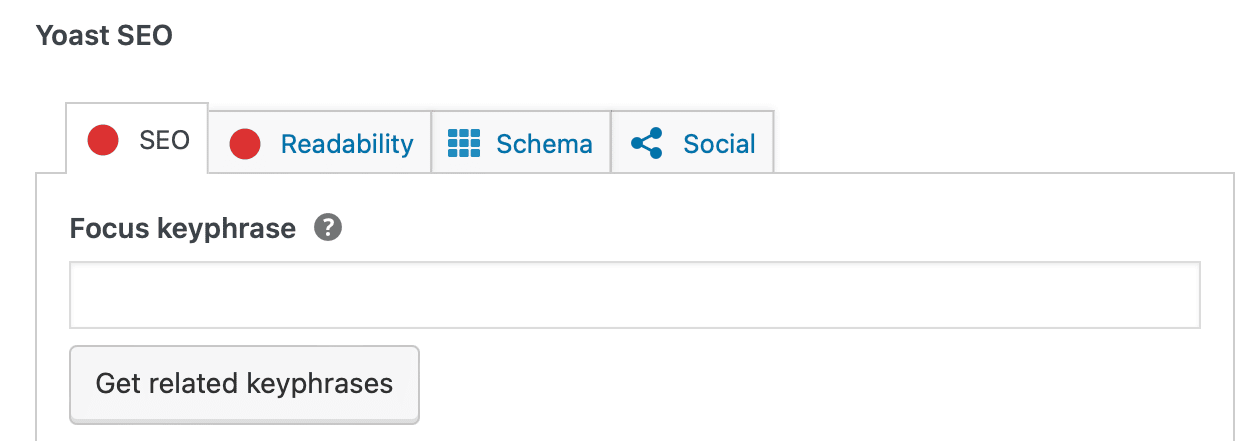
It’s important to remember that the Yoast Focus keyphrase doesn’t help you rank in Google. It’s only advice to help you optimize your content.
Beneath that, you’ll see the Google preview. You can edit the snippet manually by tweaking your SEO Title and Meta description. You’ll see the live preview adjust as you edit the information. Plus, the green light indicates that your SEO title is an optimal length:

Here, you can also enter a unique slug for your post. This is the URL where visitors can find your content. For example, our slug for this post might look something like: theserialseller.com/blog/yoast-seo.
You’ll also be able to access an SEO analysis by expanding the SEO analysis section:
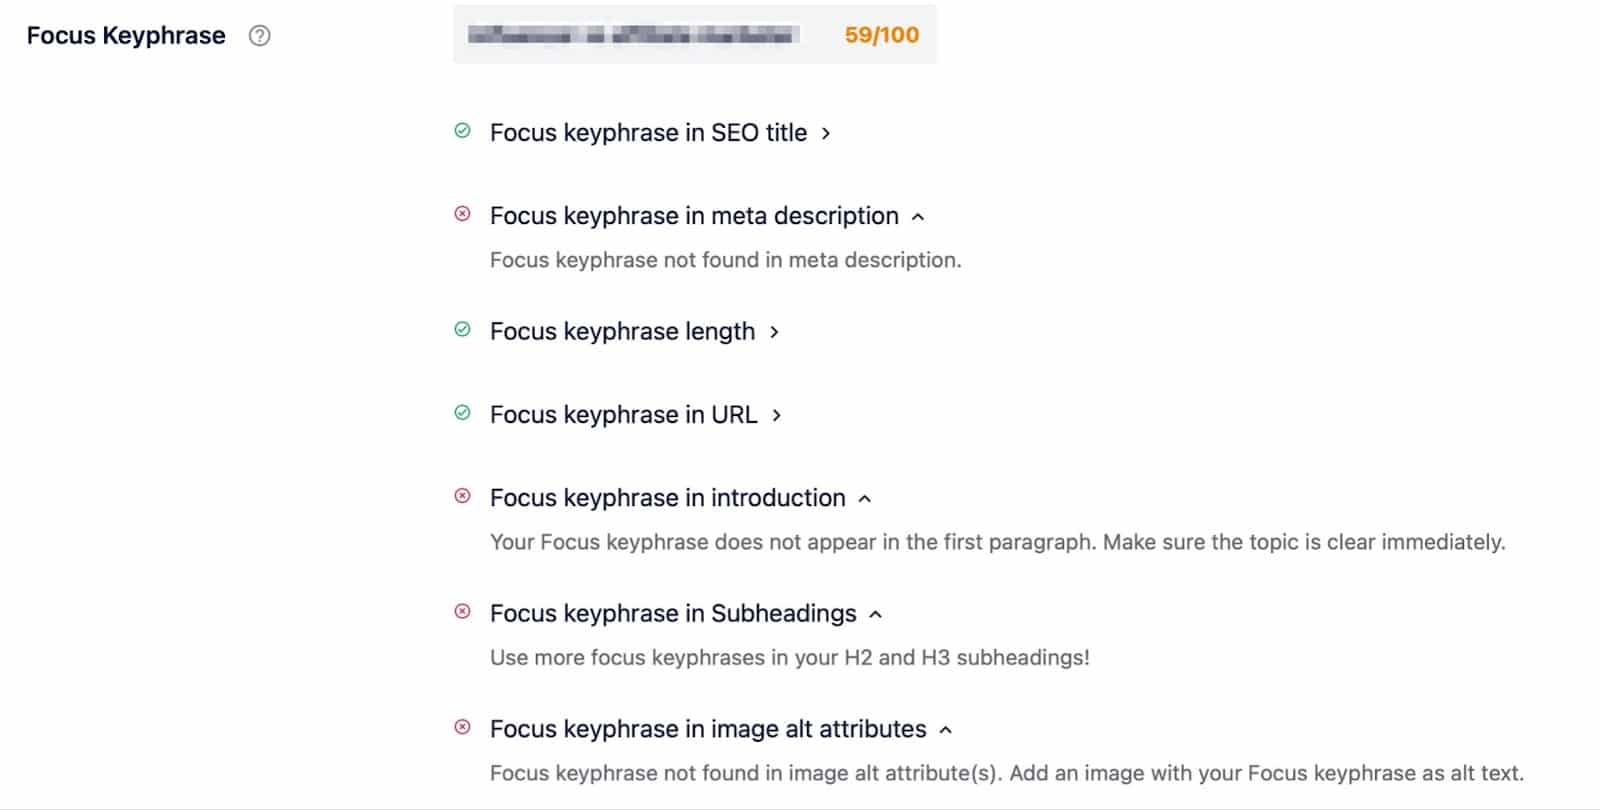
This will evaluate your content in SEO terms. For example, you’ll get an overall score for your post. Additionally, you can determine areas for improvement judging by your image alt attributes, meta description, outbound links, keyword distribution, and more.
It’s important to note that with Yoast Premium, you can obtain a premium SEO analysis, set additional keyphrases, and keep track of your SEO performance.
Beneath this section, you’ll see a Cornerstone content tab. Here, you can choose whether or not to designate the post as cornerstone content.
Cornerstone content is the core of your website. It consists of the best, most important articles on your site; the pages or posts you want to rank highest in the search engines. Cornerstone articles are usually relatively long, informative articles, combining insights from different blog posts and covering everything that’s important about a certain topic.

In other words, only choose your best content and posts/pages that you are going to keep up-to-date as cornerstone content. You can then easily sort by your cornerstone content in the posts and page lists.

Most of the time, you won’t ever look at the Advanced tab. But you can use it to:
- Stop Google from indexing this specific piece of content. Or in other words, allow or disallow search engines from showing it in search results.
- Prohibit search engines from following links on your pages.
- Specify a canonical URL to avoid duplicate content.
- Control the appearance of breadcrumbs on your pages.
If you’re interested in changing any of the default settings, then open this tab:
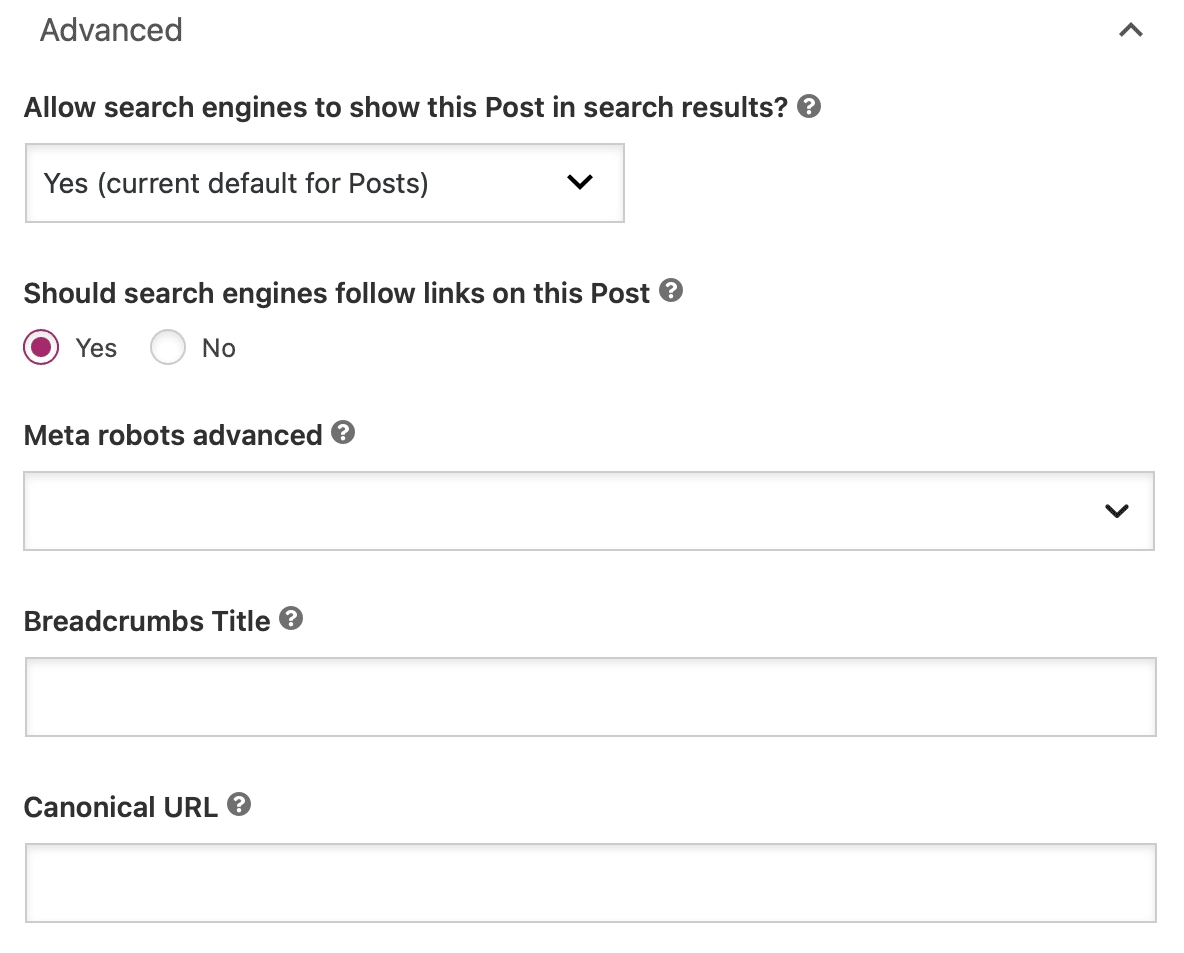
If you want to use the Breadcrumbs Title feature, you’ll need to make sure that breadcrumbs are enabled with your active theme.
The Readability Tab
In the Readability analysis area, Yoast SEO tries to apply that same concept to humans. Essentially, it tries to gauge how readable your content will be to human visitors and then makes some suggestions for how to improve your content.
These suggestions aren’t perfect – so don’t feel like you need to get a top score. But they are a good guide:

As you can see, Yoast (and search engines) prefer content that uses active voice, breaks chunks of text up with subheadings and keeps paragraphs and sentences short.
You’ll also notice that while you work on your post/page, you can see a green, orange, or red light at the top of your screen:

This gives you a quick view of your readability score and your SEO analysis. This is especially convenient because it updates in real time.
The Social Tab
In the Social tab, you can manually configure how your content will look when it’s shared on Facebook or Twitter:
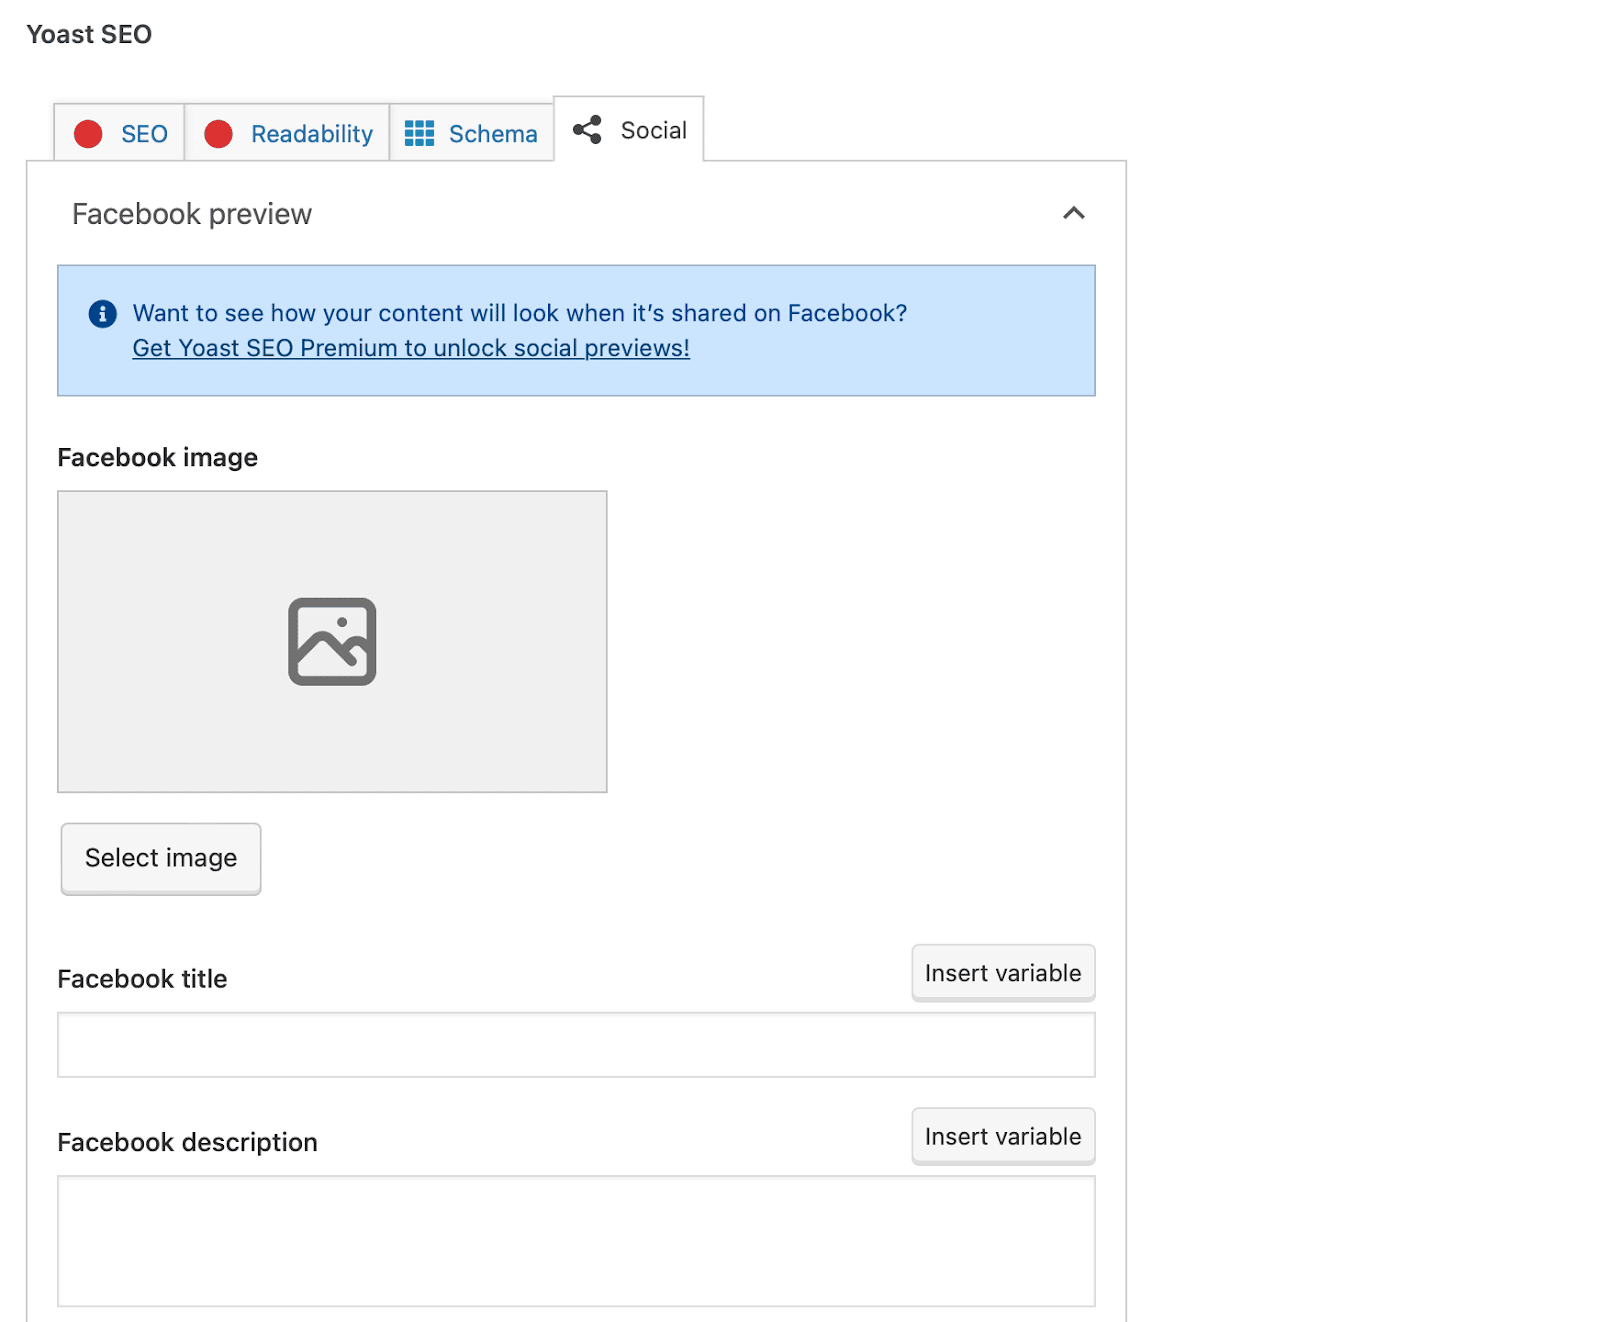
Most of the time, you don’t need to manually configure this information for each post because Yoast will automatically generate it based on:
- Your SEO title
- Your content’s featured image
But if you want to override those defaults, this is where you do it.
However, keep in mind that you will need Yoast Premium to be able to unlock social previews of your content.
The Schema Tab
The Schema tab is a new addition to Yoast SEO and is designed to help search engines better comprehend your content.
For instance, you can tell search engines specifically what type of page you’ve created such as a default post, an About page, a Checkout page, and more:
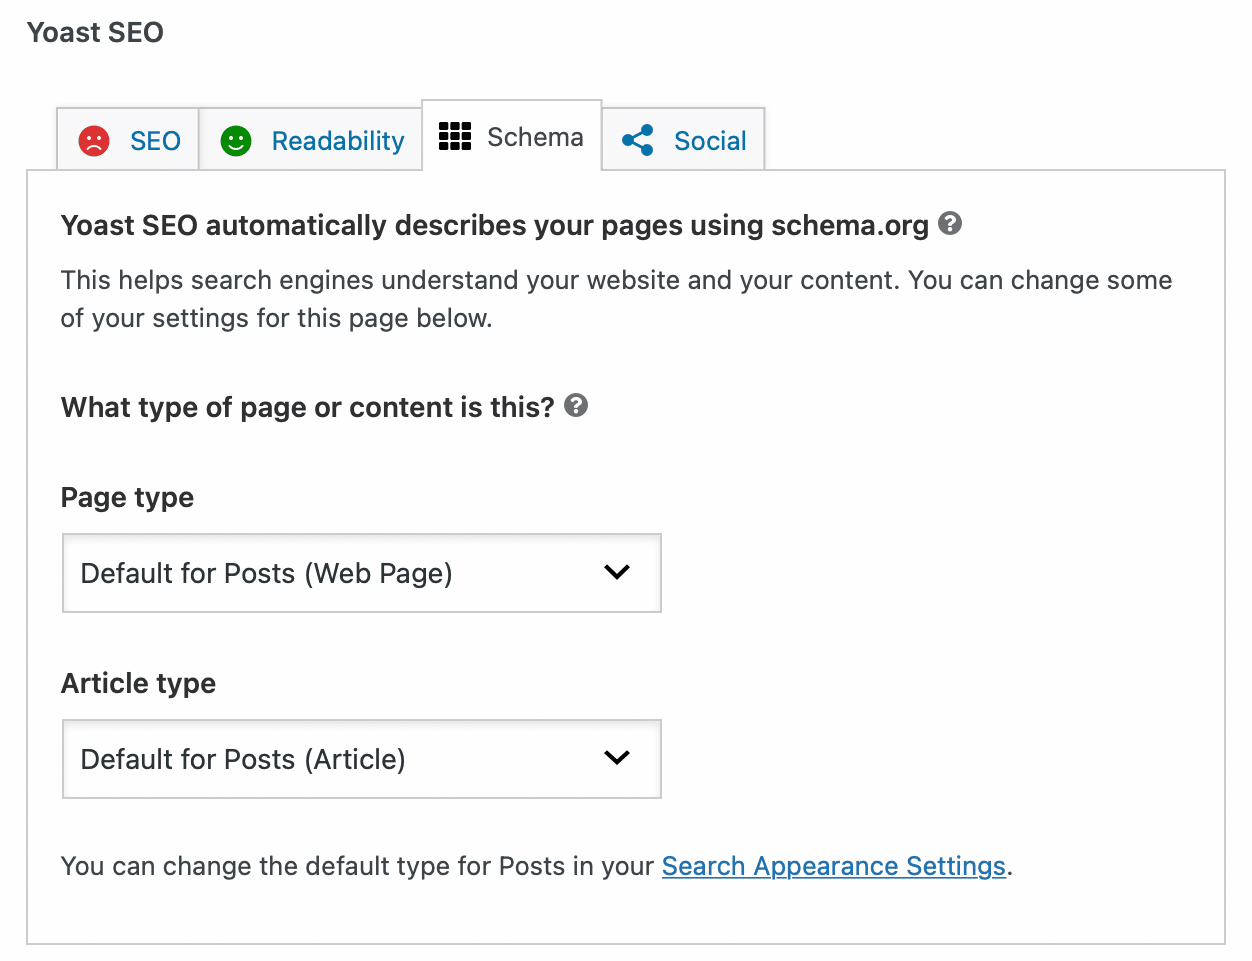
Better yet, you can even select an Article type using the dropdown menu. This allows you to communicate whether your post is a Blog post, a Report, a News article, or something else.
Exploring The Yoast SEO Dashboard
Now that you have Yoast SEO configured and understand the meta box, let’s take a look at the dashboard.
On the main page of the Dashboard, you’ll be alerted about any potential SEO issues on your site:

Yoast will provide instructions on how to fix these issues. Or, you can always dismiss the notification if you don’t want to address them.
Features Tab
The Features tab is a bit juicer than the previous tab. In this area, you can enable or disable specific features of Yoast SEO.
For example, if you don’t find the Readability analysis in the Yoast SEO meta box helpful, you can turn it off here:
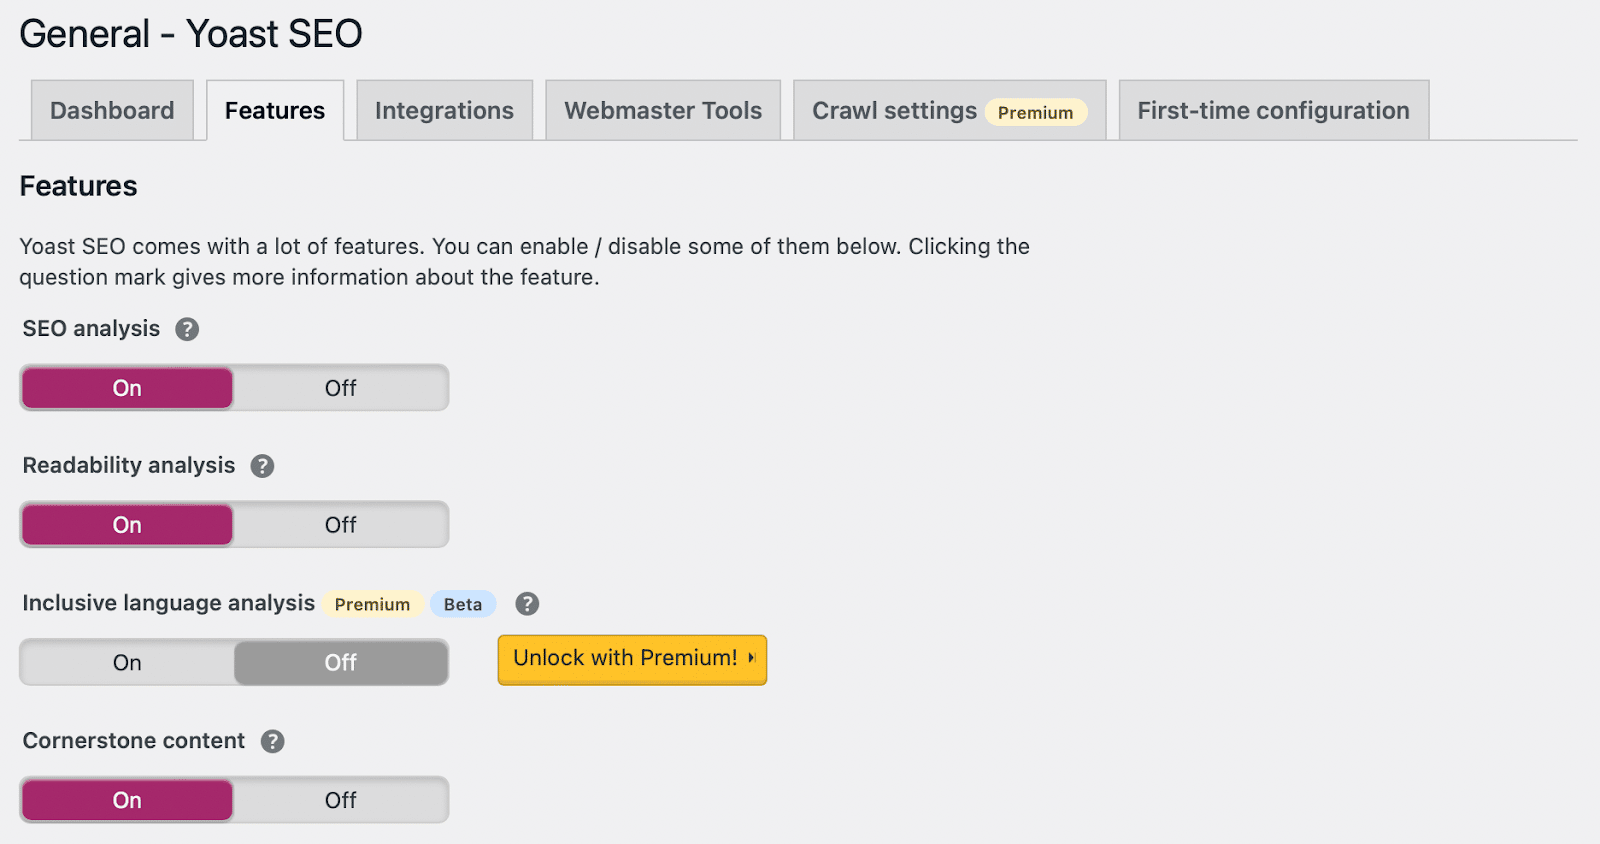
This is also where you can enable/disable security for authors. The advanced section of the Yoast SEO meta box allows a user to remove posts from the search results or change the canonical.
These are things you might not want any author to do. That’s why, by default, only editors and administrators can do this. Setting the slider to “Off” allows all users to change these settings.
Looking for your XML sitemaps? Yoast SEO can help you automatically generate an XML sitemap that you can submit to search engines.
Integrations Tab
If you visit the Yoast Integrations tab, you’ll be redirected to a separate integrations page:
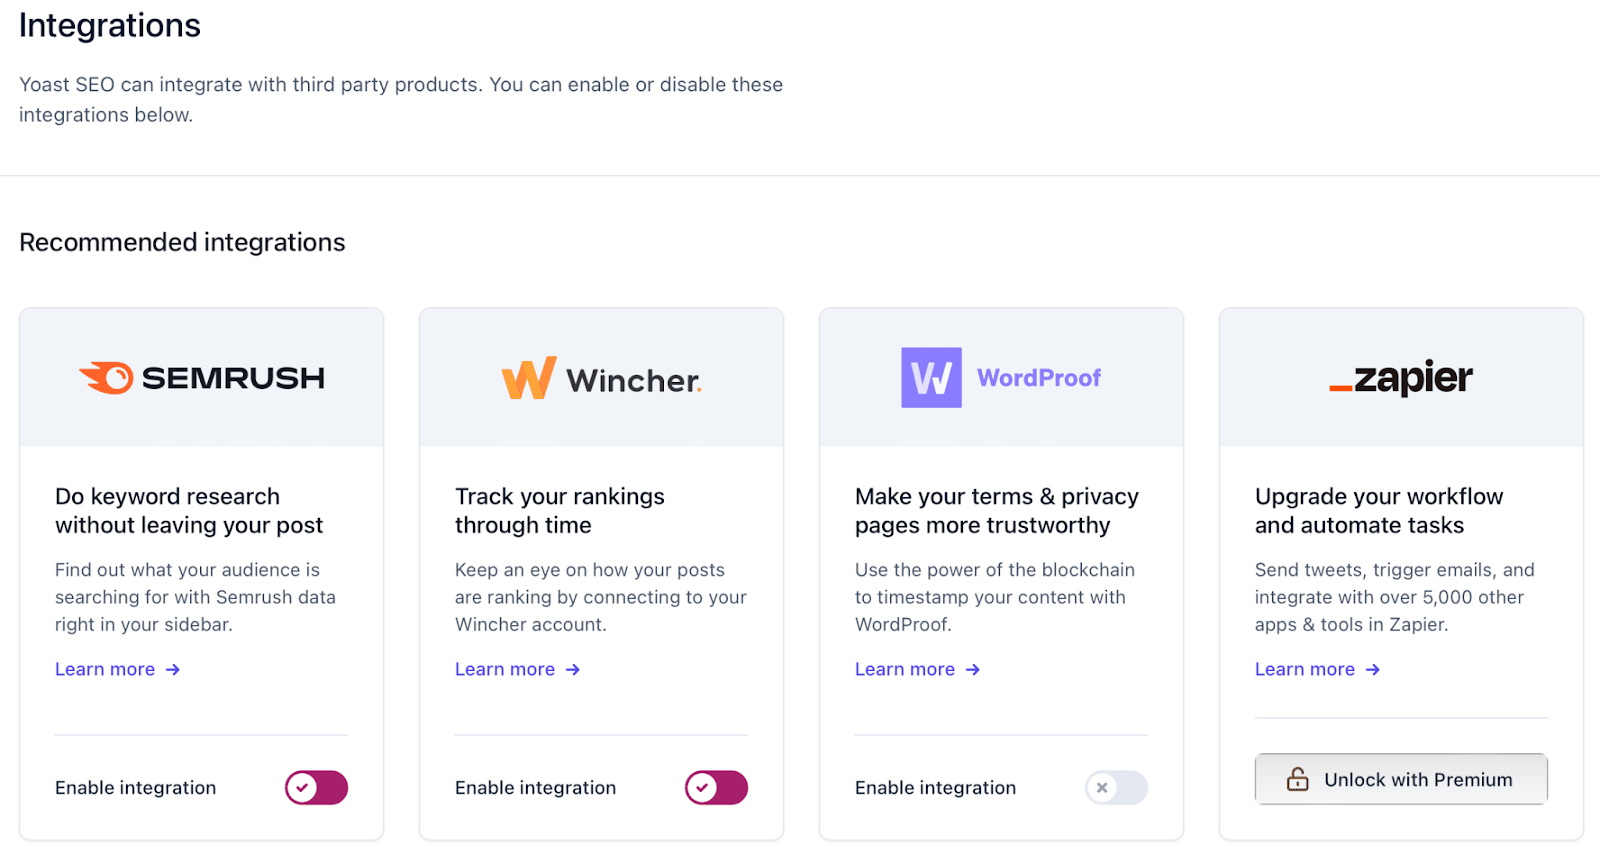
Some of these integrations are only available with Yoast Premium, such as Zapier and WooCommerce. However, those that are accessible like SEMrush and Jetpack, can be enabled using the slider.
Webmaster Tools Tab
In this tab, Yoast SEO can help you verify your site with various search engine webmaster tools:
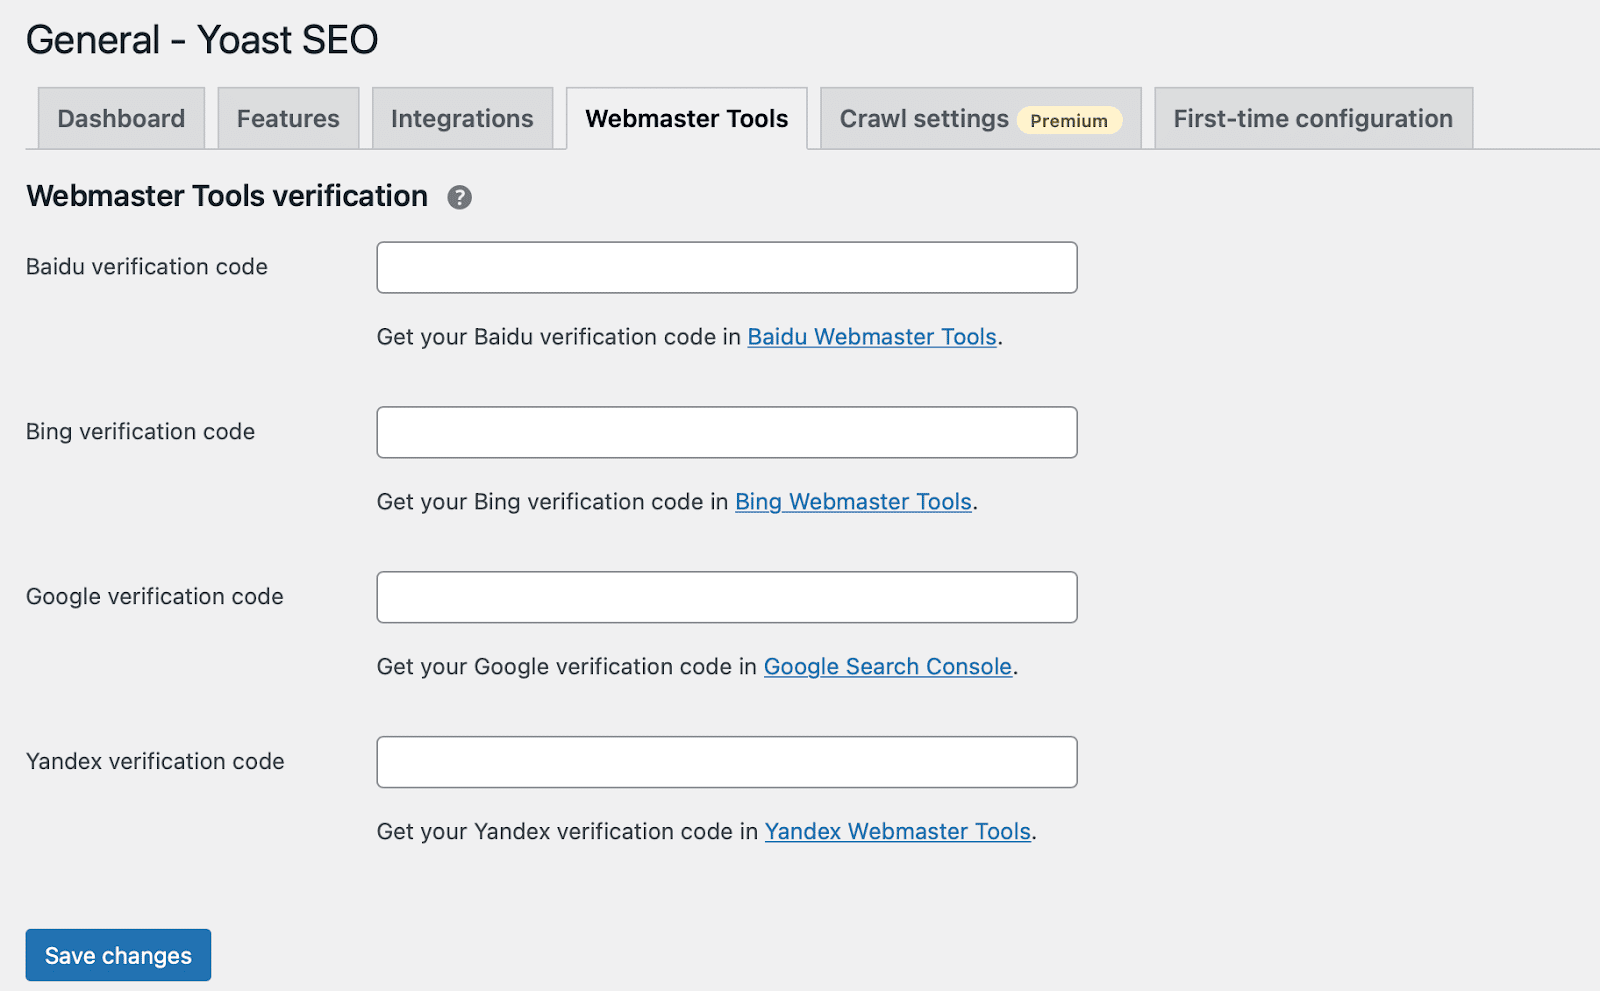
This current list includes Baidu, Bing, Google, and Yandex.
Next to your Webmaster Tools, you’ll see a Crawl Settings tab. This is only available with Yoast Premium and enables you to make your site’s crawling more economical. For example, you can remove rest API links, generator tags, post comment feeds, and more.
Lastly, you can switch over to the First-time configuration tab to revisit the configuration wizard:
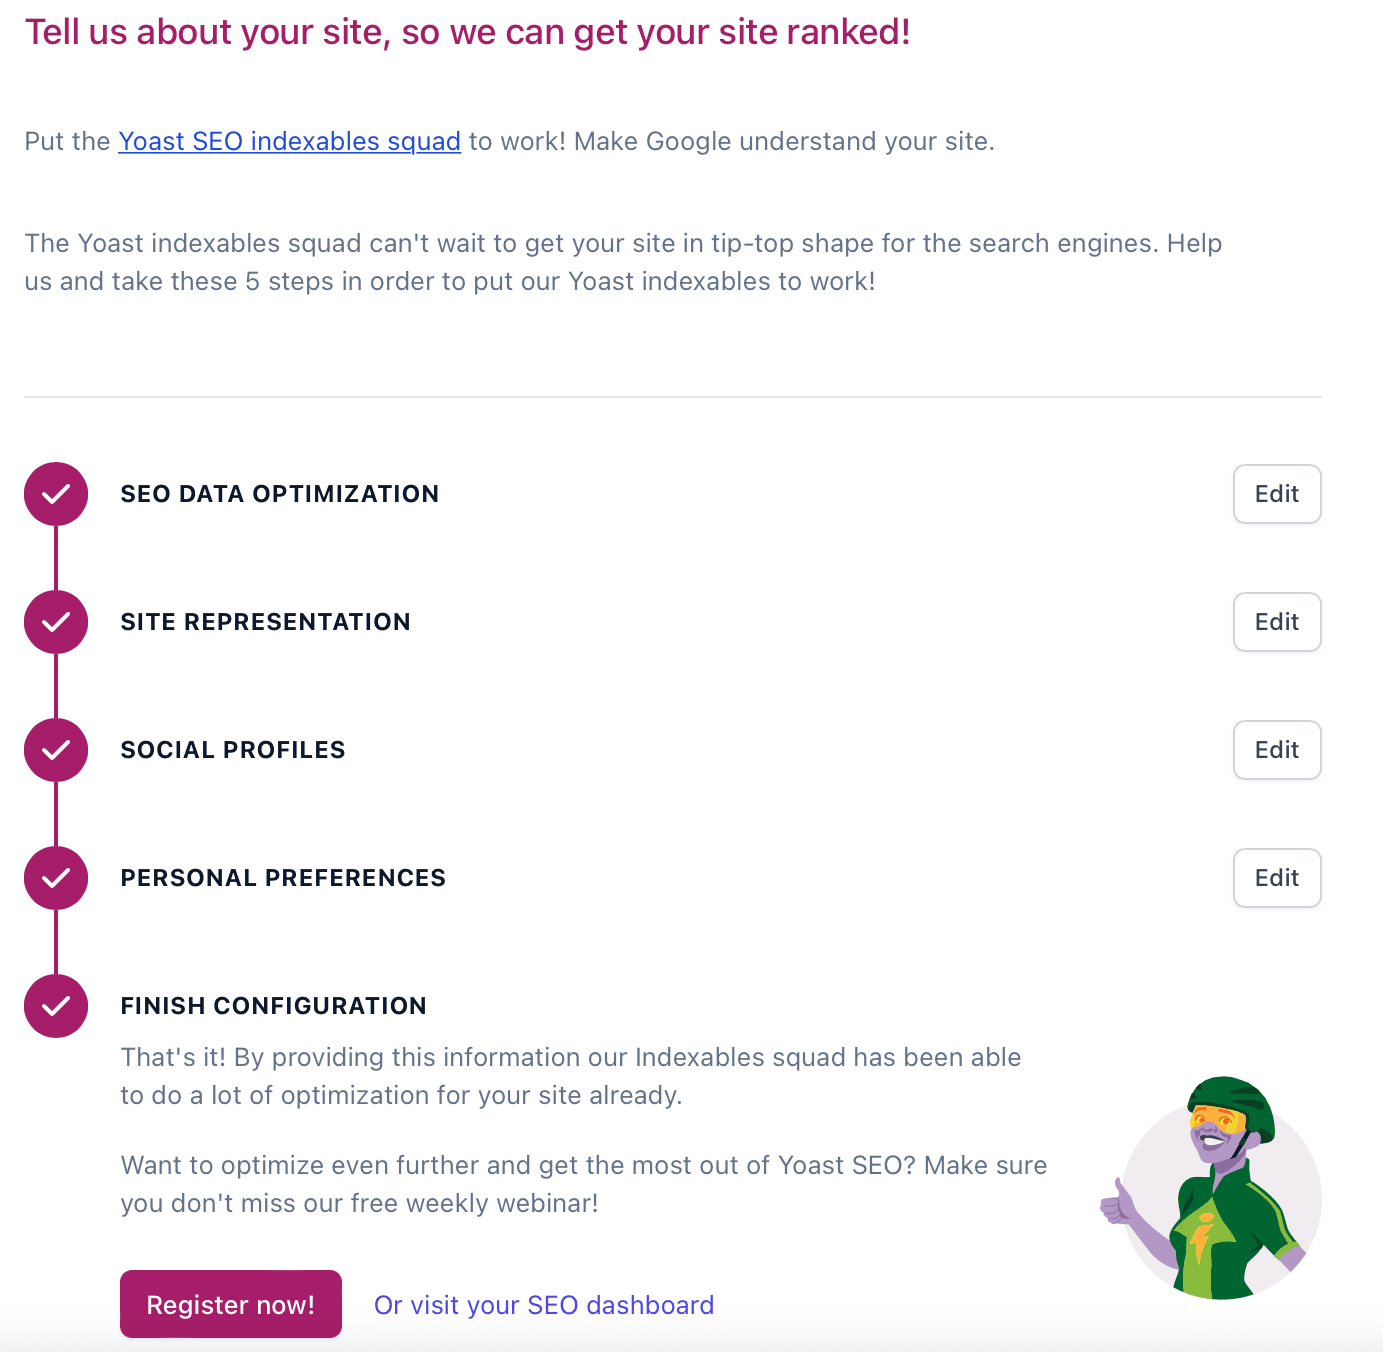
Here, you can go back into your settings to update your personal preferences, edit your site representation, and begin your site’s SEO data optimization.
The Serial Seller Summary
At the Serial Seller, we have built our entire website based on Website and Yoast SEO was the first plugin we added to our instance.
We use it for our SEO purposes mainly on pages and posts to drive viewers from Google.
If you need help with Website Development Book a Call with us Now!
About us and this blog
We are a Full-Service Sales & Marketing provider that aims to help small to medium businesses increase their leads and sales while helping remove the business owners from their day-to-day activities so they can focus more on the long-term goals of their business.
Book a Meeting with us!
We offer Done-For-You Sales, Sales Coaching, and Advisory as well as Digital Marketing Services. If you want to increase the leads generated for your business and need some guidance and accountability, book a call with us now.
Subscribe to our newsletter!
More from our blog
See all postsRecent Posts
- How Do You Stop Google Ads May 9, 2025
- How to Make Money Off Social Media May 5, 2025
- How to Duplicate Page WordPress May 1, 2025

