Ultimate Checklist For Building Your WordPress Website
- January 11, 2023
- Digital Marketing, Web Design, Web Development, Wordpress
Should you build a WordPress Website?
Do you want to be found on search engines like Google & Bing?
To increase the leads for your business, you need an online presence and that means a website…
I rate WordPress due to its ability for content management & SEO (search engine optimization) … apparently, so do a lot of other people.
Around 810 million websites use WordPress as of 2022, according to our best estimations. This represents around 43% of all websites. And that figure is growing rapidly. In fact, over 500 sites are built with WordPress every day, compared to just 60-80 on competitor platforms like Shopify and Squarespace.
WordPress is by far the most popular CMS today. Its ease of use and versatility enable the majority of users and business owners to create a website that works for their needs. Here’s how you can do the same.
1. Select a WordPress plan (WordPress.com only).
To begin creating your website, select a WordPress plan. As stated earlier, with WordPress.org you only have one (free) plan option — but it requires you to buy your domain, hosting provider, plugins, themes, and everything else related to your WordPress site.
With WordPress.com, you’ll have to choose between the five plans they offer.
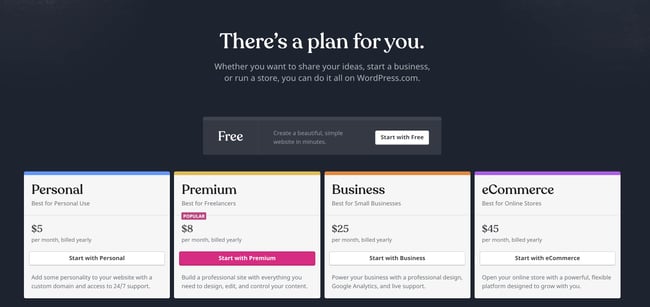
The main differences between these plans are the monthly fee, types of site customization, and the access you get to marketing tools.
2. Set up your domain name and hosting provider.
Setting up your domain name and choosing your hosting provider for WordPress typically happen around the same time in the website creation process.
Before we talk about how to complete those tasks, let’s discuss the difference between your domain name and hosting provider.
Think about your perfect domain name as your home address — it’s how your visitors are able to locate your website on the Internet. You domain name will look something like this: www.example.com.
Your hosting provider is like your house — it’s where your website files are actually stored. Without a hosting provider, your site wouldn’t have space on a server to “live.” Some of the best WordPressing hosting providers include WP Engine, Bluehost, and Kinsta.
How to pick domain and hosting providers
Again, WordPress.org requires you to create your own domain and find a third-party hosting provider for your website. WordPress.com allows you to decide whether or not you want a completely custom domain depending on the plan you choose, but it takes care of the hosting for you.
Your hosting provider is important because it impacts your website’s speed, security, and reliability. There are hundreds of providers to choose from, Hubspot put together a list of 22 of the best WordPress hosting providers to help you decide what will work best for you. All of these providers meet WordPress’ three hosting requirements:
- PHP version 7.4 or greater
- MySQL version 5.6 or greater OR MariaDB version 10.1 or greater.
- HTTPS support
When considering hosting providers for your WordPress site, make sure they meet all of the above criteria.
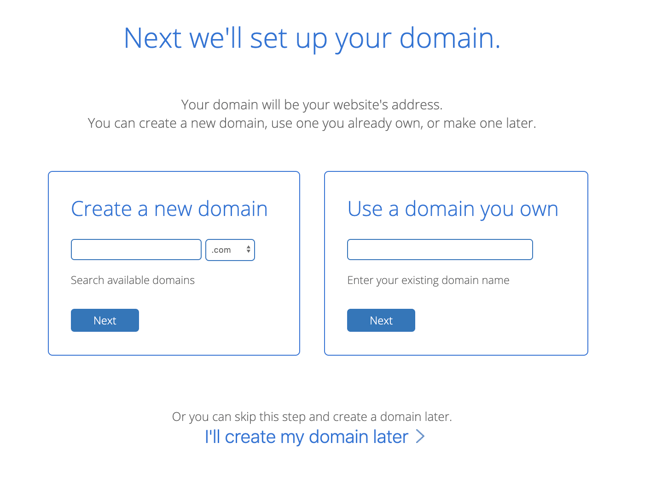
For domain names, getting one is as easy as searching and purchasing one through your domain registrar of choice. If you are new to WordPress.com but have already purchased and created a domain name elsewhere, no problem — you’ll have the option to transfer or map it to your WordPress website.
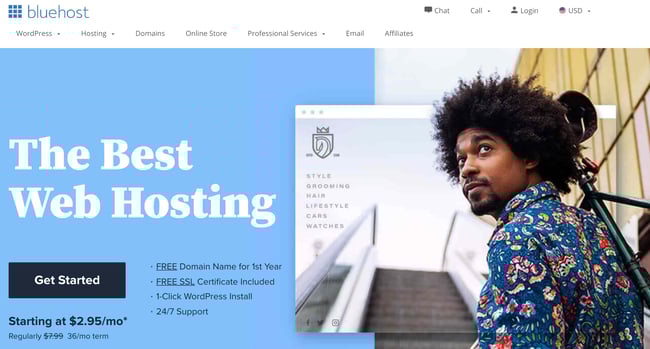
For the sake of this guide, let’s assume you do not yet have a domain or hosting provider. Here’s how to start creating your website with the popular hosting service provider Bluehost.
First, head to Bluehost’s website and click Get Started.
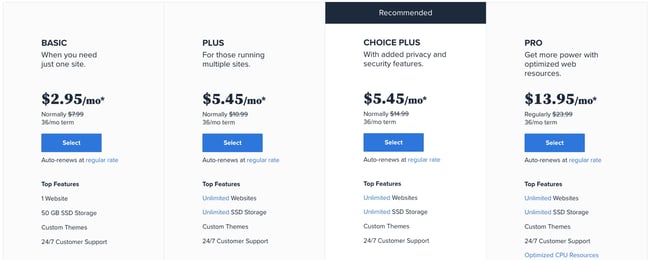
From here, you’ll be taken to Bluehost’s pricing page to choose from four plans.
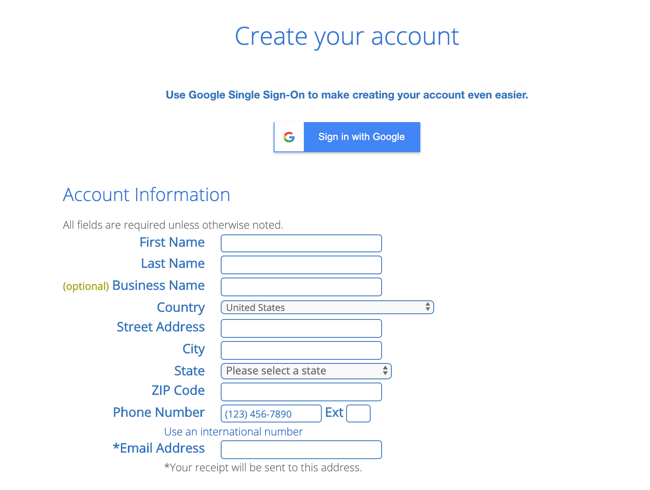
Once you choose your plan and click Select, you’ll be taken to another page to sign up with a domain name.
Once you select your domain name, you’ll be brought to a page to complete your account and billing information for your purchase.
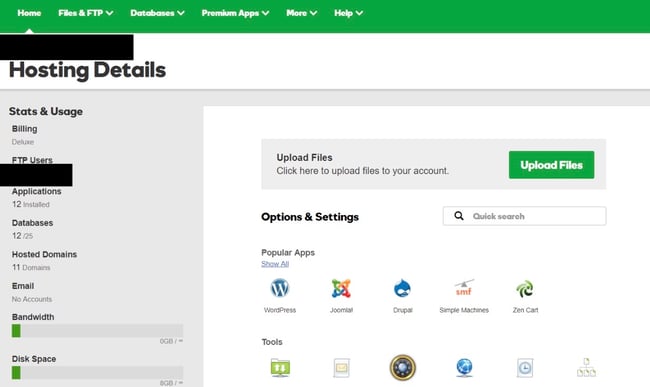
After confirming your account and purchasing your domain, you will gain access to your hosting dashboard where you’ll be able to install the WordPress CMS.
3. Install WordPress.
If you are using a hosting provider outside of WordPress, you’ll need to install the CMS to connect your new domain to your website.
This time, let’s use GoDaddy as an example. (Don’t worry, no matter the hosting provider you choose, this process looks similar.)
Note: If you choose to use a managed WordPress hosting service (recommended) like WP Engine or Kinsta, you won’t need to go through this process, as those services were built specifically for WordPress and will have WordPress installed for you.
To start, log into your GoDaddy account, click Web Hosting, and then Manage. You will be brought to a screen with your account details.
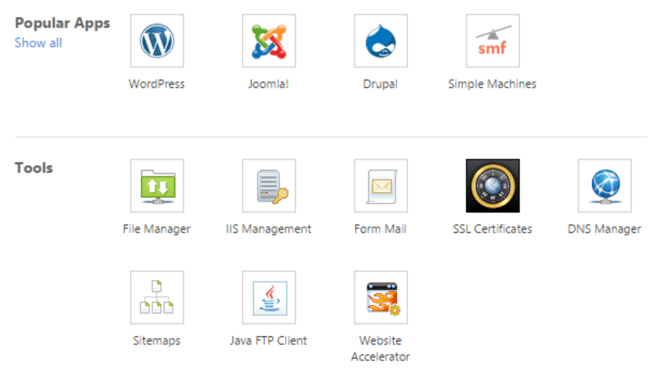
Scroll down and under Options & Settings, you will see an area titled Popular Apps. Click on the WordPress app to begin the installation process.
After installing WordPress, you’ll need to answer a few questions about the domain you want to use, the directory where you want to install WordPress, and your admin information.
After about 24 hours, your website will be installed to your hosting account, and GoDaddy will send you an email confirmation.
Now that you have your domain set up and WordPress installed, you’ll next need to set up your “Primary Domain” within WordPress, so your visitors see your website when they search your domain.
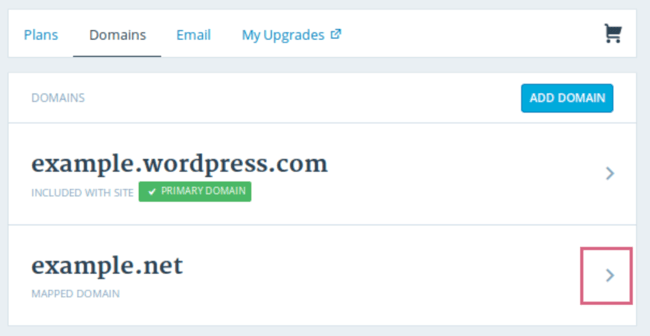
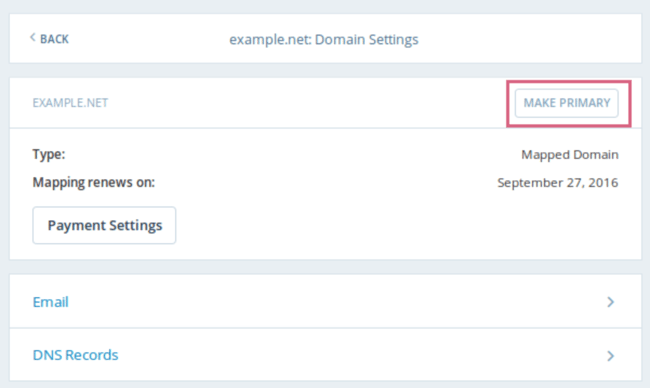
In WordPress, go to My Site and click Domains. Select the custom domain you want to make your primary domain.
Then, click Make Primary.
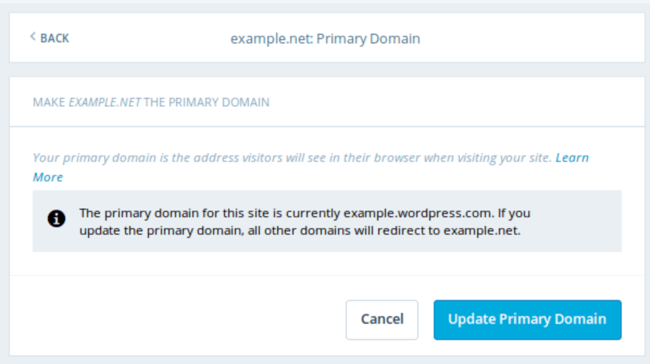
Confirm you meant to make this change by clicking Update Primary Domain.
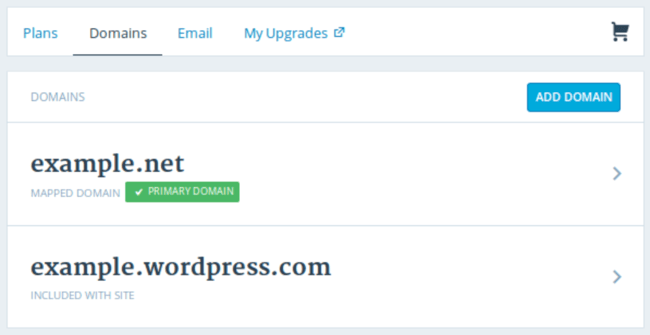
Verify the update was successful by looking for a green box with a checkmark that says Primary Domain.
Now, on to step four: making your website look nice.
4. Choose your theme.
You can customize your WordPress website using WordPress’ many themes including business themes and templates, each of which contains a multitude of layouts, formatting styles, colors, fonts, and other visual options.
WordPress automatically applies a default theme that looks rather plain. You can keep it, but your website visitors may not be so impressed. A custom WordPress theme, whether it’s paid or free, will make your website look appealing and professional to your buyer personas.
Similar to the wide range of hosting providers available, there are also hundreds of themes and templates to choose from. To help you out, Hubspot put together a guide to 20 of their favorite themes and templates and categorized them by purpose. Whether you’re looking for a theme versatile enough for multiple different business types, or one suitable for your e-commerce site, portfolio, blog, or business, there’s a theme that will work for your specific needs. On top of your theme, you can further customize your pages with a builder tool like Elementor.
To find a theme that works best for you in WordPress.org, head to your admin dashboard. Click Appearance, then Themes. You’ll be brought to another screen where you can browse available themes or search for a specific one you have in mind in the search field.
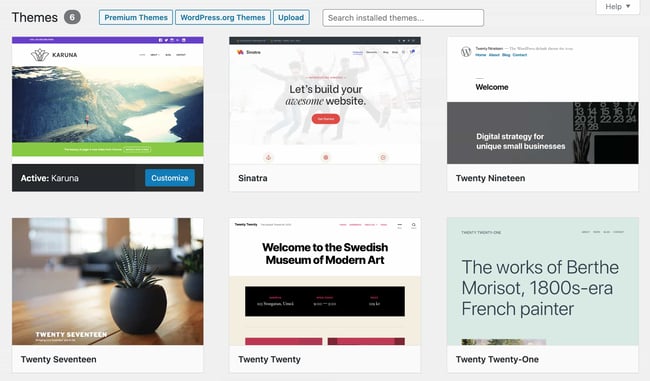
Once you find the perfect theme, simply install it to begin customizing. Each theme has different steps required during the customization process, so be sure to follow them closely. If a theme has a website (often accessible through the WordPress theme and template library), check for documentation as you work through the customization process.
5. Add blog posts and pages to your website.
When you add content to your WordPress website, it’s usually displayed in the form of posts and pages.
Posts (or “dynamic pages”) are typically used for blog posts and portfolios because they automatically place your newest website content at the top of your featured content. Pages are static, which is why they appeal more to business owners — the added content stays in the same place.
Posts and pages are the main post types in WordPress. Additionally, there are other native post types, as well as custom post types. For now, we can just stick to pages and posts.
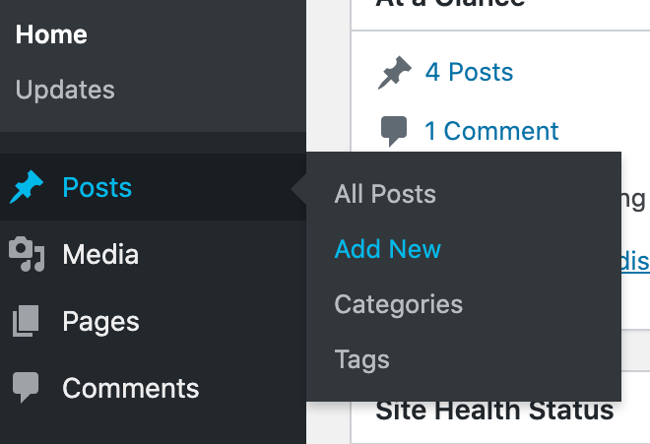
Start by deciding whether you want a post or page to serve as the homepage (or any page) of your website. To add a post to your website, go to the admin panel, click Posts and then Add New.
You can add a title for your post, place photos, change the format, and insert page elements via blocks and shortcodes. Click Save Draft to save your changes as a draft, or click Publish to immediately take the post live.
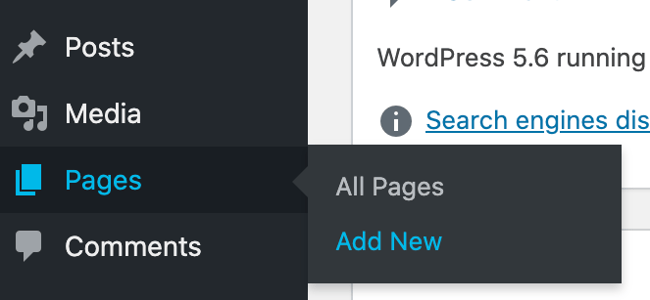
Adding a page to your website is a similar process. In your admin area, click Pages, then Add New.
First, add a title to your page. Next, you can insert photos, embed videos, and add content. Follow the same steps to create multiple pages for your website. When finished, click Save Draft or Publish.
6. Customize your website.
Beyond the theme you choose, there are a number of ways to further customize your website. Let’s review a few options.
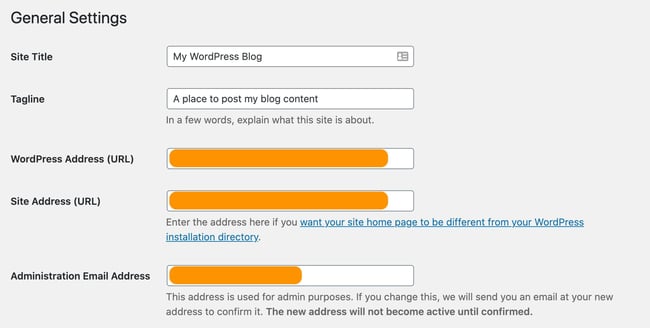
First, let’s customize your site title. From your admin dashboard, select Settings > General. Here, add your website title and tagline. You can also toggle other basic site information like you URL, email, time zone, and more.
Next, let’s customize your reading sections. Under Settings > Reading, you can change your home page to a static page.

Consider this if you’re a business owner who prefers having content remain in one place on your website. Consider using a dynamic page if you’re a blogger who prefers having your newest content appear at the top of your pages. This way, your visitors can easily find your latest posts and they are seeing it in the same content formats.
The navigation bar is customizable, too. This enables your visitors to easily find information on your website.
Add a navigation bar by going to your admin dashboard, clicking Appearance, and then Menus.
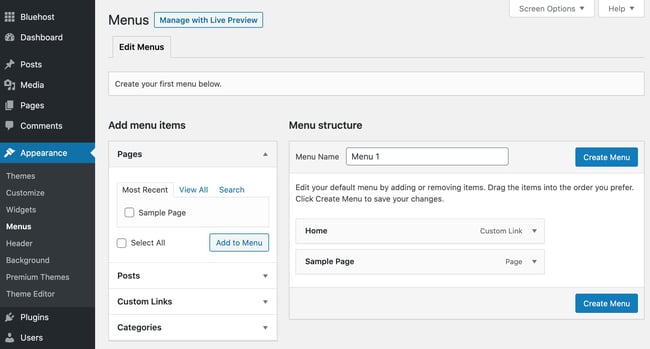
From here, you can determine how you want your bar to look, how many pages you want to include, what you want to title those pages, and what order you want them to be listed in.
Of course, this is just a fraction of what you can do in the dashboard — click here for more information on your WordPress site settings and customization options.
7. Install Essential plugins.
Plugins are pieces of software that add functionality to your WordPress website and enhance the user experience. With over 55,000 available plugins, there are options for most every type of website and user. Some of the most popular plugins available include:
- HubSpot WordPress Plugin: Easily add pop-ups, forms, and live chat to your WordPress website. And as an added bonus, pair this plugin, or other CRM plugins, with your HubSpot CRM.
- All in One SEO: A top-rated SEO plugin that’s used by businesses to improve their rankings and uncover new SEO growth opportunities.
- The Events Calendar: An effortless events calendar that makes scheduling events from your site easy.
- Yoast SEO: The go-to plugin to help you with on-page SEO. This app makes sure you’re following best practices before you push your site live.
- TablePress: Need a table on your site? Look no further.
- The SEO Framework: Another plugin that can help you master SEO on your site.
- Weglot: A top translation plugin for translating WordPress and WooCommerce websites.
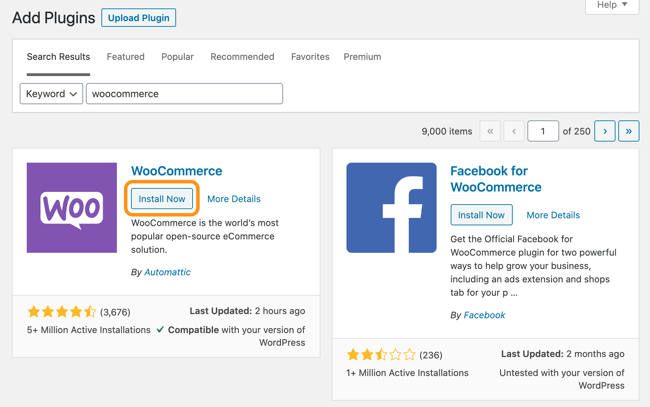
To begin the installation, head to the Plugins section in your admin dashboard. This shows you all the plugins currently installed on your site. Depending on your host, you might have several plugins installed already. Note that for a plugin to work you must activate it after installation.
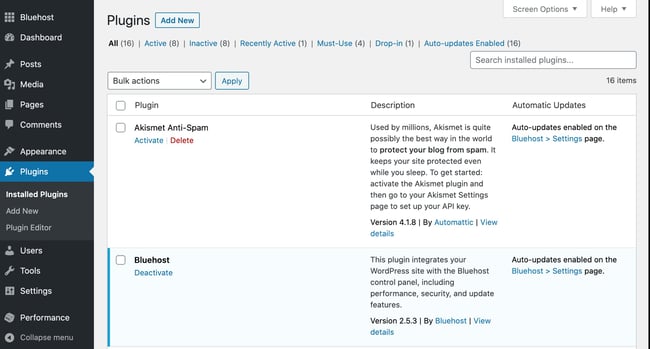
To add a new plugin, click Add New. Search for your desired plugin and then click Install Now, wait a few seconds, then click Activate.
8. Optimize your website to increase page speed.
Website performance is a critical part of the user experience. If a page takes too long to load, your visitors will move quickly to another site. You don’t want to frustrate visitors with slow speeds.
You can improve your website’s performance by enabling browser caching. Browser caching is the process of temporarily storing your website’s data on your visitors’ browsers. That way, your content doesn’t need to be sent from the web server for it to appear in the browser, which increases the website speed.
To enable caching for your website, install and activate a caching plugin with the process described above.
For instance, WP Rocket is a WordPress caching plugin that will make your site faster in a few clicks. Thanks to powerful options such as Remove Unused CSS and Delay JS Execution, you’ll save time and effort while improving your Core Web Vitals grades, the PageSpeed Insights score, and the overall loading time.
9. Get inspired by WordPress website examples.
As you begin to customize your website, you may feel overwhelmed by all the options you have. Instead of starting completely from scratch, it helps to grab some inspiration from other exemplary WordPress websites. Here are some of our favorites:
99% Invisible is a popular podcast that focuses on design and architecture. Their website is sleek, modern, and offers easy navigation for visitors to quickly access each podcast episode.

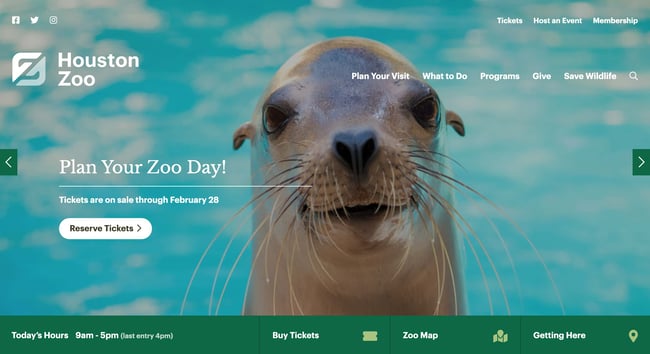
The Houston Zoo’s website displays its main attraction on the homepage. The magnifying glass icon on the top menu bar makes searching the site effortless.
Awesome Motive, the creators behind several WordPress projects, engages their visitors with a polished, yet simple website. It features subtle animation to grab people’s attention.

What to Do After Your Site is Ready?
We’ve shared how to create a website in WordPress, step-by-step. So, your site is ready. But that’s not all! There’s still some work you should do to make your website successful.
1) Create a Contact Form
Creating a contact form for your WordPress website is a must. It’s because the contact form helps to maintain effective communication between you and your potential audience. Everest Forms is the best WordPress contact form plugin available in the market. This free drag and drop form builder allows you to build any kind of form quickly and easily.

Everest Forms provides several pre-made templates so that you can make small tweaks to the template and instantly create a contact form. Or else you can also create a contact form from scratch or a blank page.

You can simply drag the required field like Name, Number, Emails, etc from the left-hand side and drop it to the right-hand side to the desired positions. Besides, you can also make other necessary settings like General settings, Email settings, etc. with this plugin.
2) Start Building an Email List
Emails are one of the most popular and effective tools for digital marketing. Via emails, you can send news about your product updates to your customers, discount offers, etc. Also, you can share your latest blog articles. etc. But for that, you need to create an email list first.
An email list is a list of email addresses of users who agreed to receive emails from you. Hence, creating an email list means collecting emails. One of the best ways to collect emails is via sign-up forms on your website.

In WordPress, you can easily add an email subscription form on your website using the all-in-one form builder plugin “Everest Forms”. You can create a subscription form starting from scratch or tweak the pre-existing form templates provided by the plugin.
Moreover, with a pro version of the plugin, you can get access to the add-on “Email Templates”. It allows you to customize the emails that you send to your users.
One important tip: Always, use a professional email with your custom domain. If you’re a Google user, then there’s also an option to use Gmail with a custom domain.
3) Add Social Share Buttons on Your Blog
Creating a WordPress website isn’t enough. You’ve to popularize your site if you want to grow your brand. And what could be an easier way than to share your content on social media? It’s one of the biggest and largest platforms to share your content and grow digitally.
To grow your site’s popularity, you can add social share buttons to your blog. Basically, these buttons allow your users to share your posts on their social media timelines. Hence, their friends and family can also see your work on their timelines. This gives your site a bigger exposure.
The easiest way to add social share buttons on your blog is through plugins. The most popular plugin on the market has to be Easy Social Sharing. The plugin allows your users to share your post and also displays the total number of shares. Not to mention, you can effortlessly download the plugin from WordPress.org free of cost.

4) Add Google Analytics & Start Measuring
Google Analytics is the best tool when it comes to understanding your audience. It tracks all the data of your visitors and gives you a better understanding of your website. It gives you insight into your most popular pages and posts. Not only that, you can know about the age, gender, location, and interests of your audience.
It’s super easy to add Google Analytics to your website. First of all, you need to sign up for a Google Analytics account. For that, log in to the Google Analytics website.
Next, it takes you to the account creation page where you need to fill in your account name and data sharing settings. After that, you need to fill up the details of your website. Such as your Website Name, Website URL, Industry Category, Reporting Time Zone.

Once you’ve filled the form, you need to connect Google Analytics to WordPress. One way is connecting manually, and another is using the Site Kit WordPress Plugin. After you’ve connected, you can easily see your audience report, acquisition reports, behavior reports, conversion reports, and real-time reports.
5) Prevent Comment Spam
Comment spams are unwanted or unnecessary messages that are sent over the internet by spammers. These spams may hamper your site in many ways and may also slow down your site’s performance. Hence, preventing such spam is another important task after creating a WordPress website.
One of the easy ways of preventing such spam is from the WordPress dashboard itself. That’s right, the best CMS platform also has built-in functionalities to prevent possible spam. For this, you need to navigate to Settings >> Discussions and enable or disable various discussion settings as per your need.
Besides, there are many WordPress anti-spam plugins for this purpose. One of the best and free of which is the Akismet Anti-spam plugin. Akismet is the most popular open-source plugin by Automattic, the team behind WordPress itself. This plugin checks all of your comments automatically and separates those which look like spam.

6) Improve Your Website Speed
Imagine, you open a website and it takes forever to load. Would you visit that site again? We assume your answer is ‘No’. That’s why the loading speed of your site is very important to attract more audience.
Actually, the right question is, therefore ‘how to create a fast WordPress website?’.
To increase the speed of your site, you need to install a plugin. There are several plugins however, we recommend the WP Rocket plugin. It’s one of the best all-in-one WordPress speed optimization plugins. WP Rocket is a premium plugin, and you can purchase it for a price starting at $49/year.

Best of all, the plugin is user-friendly and you can set it up in a matter of seconds. It provides image optimization, database optimization, and even the ability to host Google Analytics code on your site. With the help of WP Rocket, your site will load as fast as a rocket.
The Serial Seller Wrap Up
Before we wrap up, let’s revise the steps one more time. You can go back and see above if you missed any steps here.
- Buy a Domain Name and Web Hosting Account
- Install WordPress and Login to Your WordPress Dashboard
- Select a WordPress Premium Theme, Install it, and Customize it
- Add Additional Features on Your Site Using Plugins
- Create Content (Adding Pages and Posts)
- Make Your WordPress Site Security Strong
- Optimize Your Website for SEO
- Optimize for Desktop & Mobile Devices
- WordPress support options
This is basically what we’ve included in this WordPress website building tutorial. You can bookmark this article and always check it out when you need help on any step.
As you can see, the process is simple enough. The great thing about WordPress is that even absolute beginners will be able to have a site of their own in no time.
Having a website in this day and age is no longer an advantage but necessary to driving traffic and leads to your business.
If you need help with a Website or just want assistance with generating leads for your business, Book A Call With Us Now!
About us and this blog
We are a Full-Service Sales & Marketing provider that aims to help small to medium businesses increase their leads and sales while helping remove the business owners from their day-to-day activities so they can focus more on the long-term goals of their business.
Book a Meeting with us!
We offer Done-For-You Sales, Sales Coaching, and Advisory as well as Digital Marketing Services. If you want to increase the leads generated for your business and need some guidance and accountability, book a call with us now.