Create a Facebook for Business Account: Step by Step Guide
- January 4, 2023
- Facebook, Inbound Sales, Social Media
Want to create Facebook for business account?
Don’t know how to set up a Facebook Page for your Business?
We will walk you through the process of how to create a Facebook business page that will increase brand awareness, generate leads, and drive sales with your target market.
First, create a new page, enter your business information, and upload images for your cover and profile pictures. Then, optimize and customize your page, publish it, and promote it.
Follow along below step-by-step to create your Facebook business account and learn tips to set your page up for success.
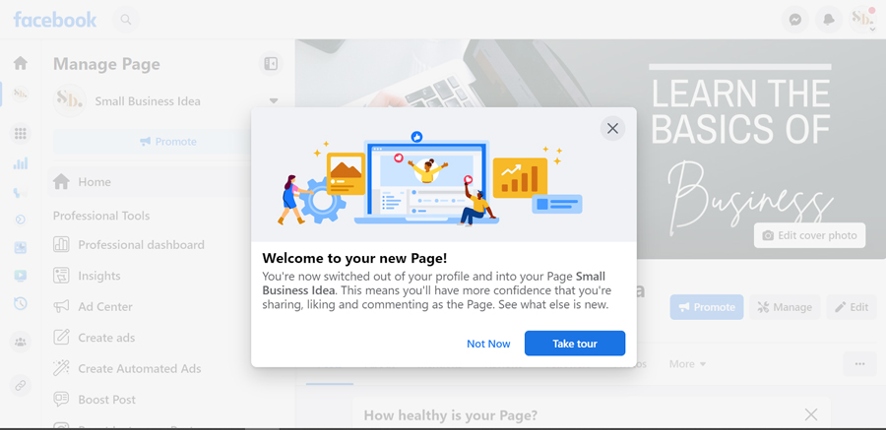
1. Log In to Facebook & Create a New Page
Desktop shortcut: Log in to Facebook > Menu > Create > Page
Mobile shortcut: Log into Facebook > Click on your profile > Pages > +Create
How to create a Facebook business account from a mobile device
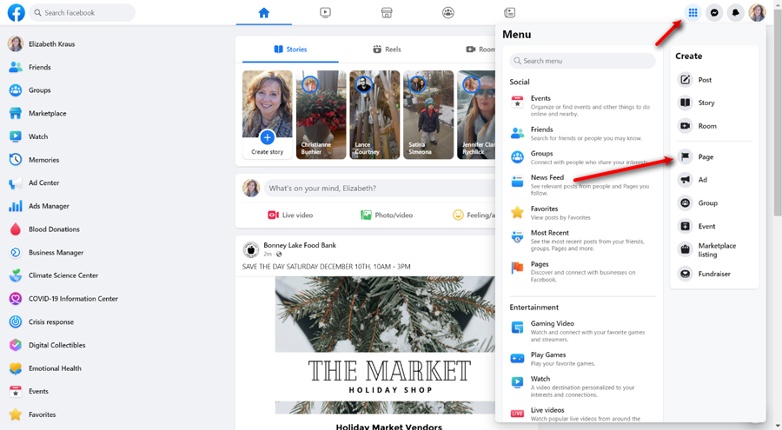
Facebook business pages are created using your personal Facebook account, so you’ll need to first log in to your Facebook account (or create one if you don’t already have one). In the Facebook interface on a desktop device, choose the nine-dot icon at the top right. Then, under Create, choose Page. Alternatively, if on a mobile device, click on your profile icon at the top of your page, scroll down to Pages, and then click the Create button.
2. Enter Basic Business Information
Shortcut: Input Page Name, Category, Description > Click “Next” > Input Contact Info, Location, and Hours
On the following screen, input your basic business information, including your page name (usually your business name), category, and a brief description of your business. When done, click the “Next” button at the bottom of the screen.
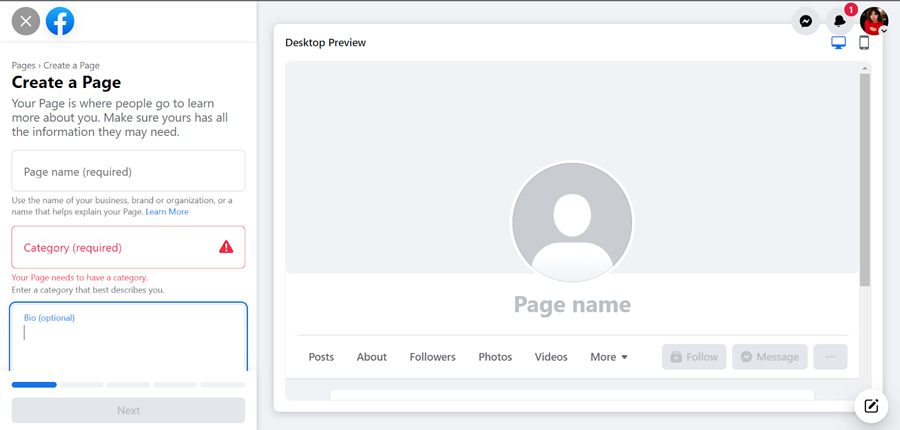
Input information to set up a Facebook business page
The next page of the Page builder will then ask you to input additional information. Although this is optional, it is best to complete these fields to make your business more accessible. Adding the location will also help people find your business page when searching on Facebook.
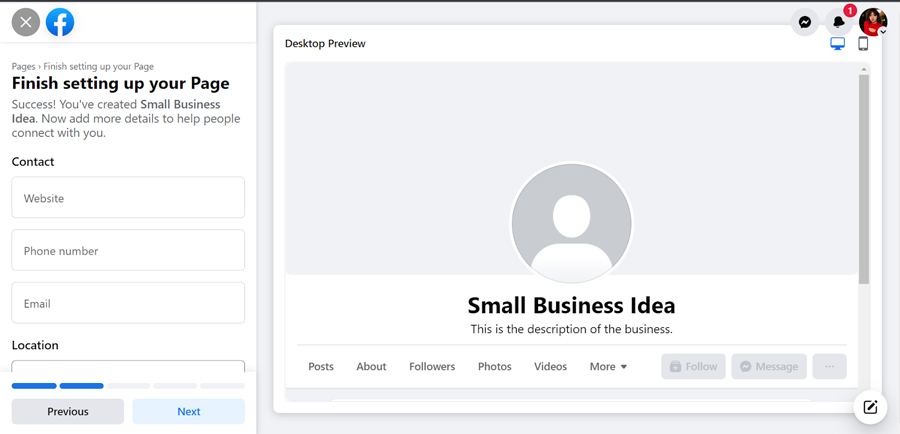
Finish setting up your Facebook business account by adding additional information
3. Upload a Profile Picture & Cover Photo
Shortcut: Upload Profile Picture > Upload Cover Photo
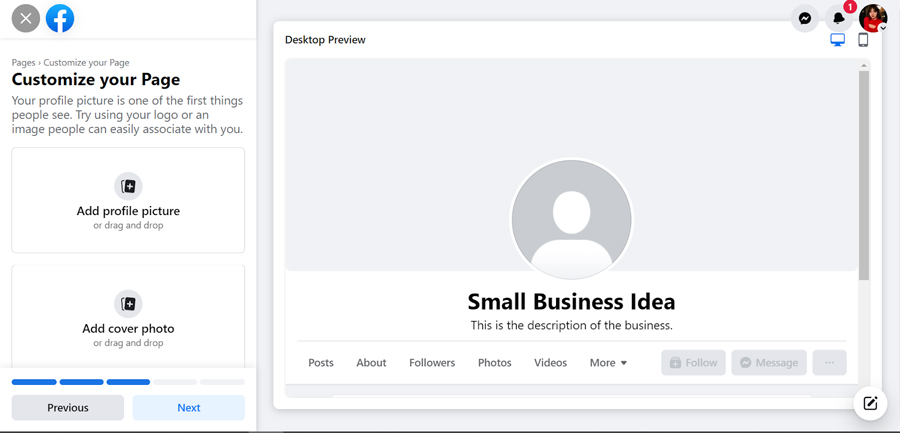
Next, upload a profile photo and a cover photo. When done, click the “Save” button at the bottom. For Facebook business page design ideas and more inspiration about what to use for your profile and cover images, check out our list of Facebook page templates.
Businesses commonly use logos as profile pictures for social media marketing, but you may use any photo that represents your business and brand well. For instance, a realtor will often use their professional headshot as their profile cover, rather than the logo of their brokerage. On the other hand, an author might use the cover of their latest or best-selling book as the profile picture for the Facebook business page.
Make sure your cover photo is visually appealing and representative of your business. To avoid sizing issues, use Canva to create or edit your cover photo. It’s free to use and has dozens of predesigned templates you can use to easily make your cover photo.
Profile picture and cover photo for business page examples from Canva;
4. Add More Info & Optimize Your Page’s Content
Shortcut: Go to “About” > Add new information from the tabs
After you’ve completed the steps above, you have successfully created a Facebook business account, but the process isn’t yet complete, especially if you want your page to support your business goals. From your new Facebook business page, right below your profile icon, choose the About tab. Input additional information such as price range, services, language, or interests, and add a link to your small business website. You can also add privacy and legal information if necessary.
A list of information you can add to your page
Prompt for learning more about how to set up your Facebook business page
The more information you add to your page, the more searchable content your Facebook business page has. In turn, this makes it more likely that your page will be found when someone searches for related content, such as services, products, or businesses like yours on Facebook. As such, it’s also smart to use keywords that someone would use when searching for a company like yours throughout your Facebook business page’s input fields, and going forward, in posts as well.
Adding keywords is a crucial way to optimize your page for search, and you can find good words and phrases to include using low-cost and free keyword research tools, like Semrush. To optimize your page for viewers, your page should tell readers what they want to know about your business, including ways to contact you and your products, services, or menu. Complete the sections applicable to your business, as it may be a potential customer’s first point of reference for your company.
5. Customize Your Facebook Business Page
Customizing your Facebook page makes it easier for interested people to do business with you. For example, adding a button can drive your audience to the first or next step of your sales pipeline by taking them to a dedicated landing page, your online store, or integrating email marketing software to build your contact list. Likewise, tabs and advanced settings provide more ways to align your Facebook business account to your customer’s journey and operations.
Open the tabs below to learn more about different ways you can customize your Facebook Business Page to increase engagement:
Add a Call-to-Action Button
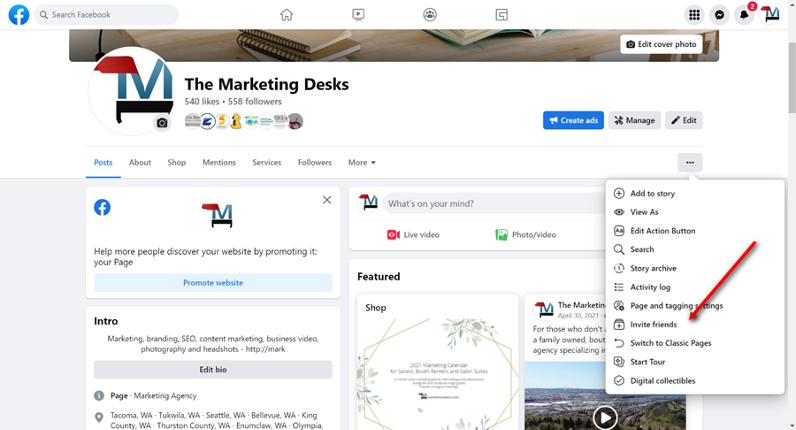
Shortcut: Click “Edit Action Button” > Select an action from the list
Be sure to add one or more call-to-action (CTA) buttons when creating a Facebook business page. These are displayed to page visitors in the top right-hand of your page below your cover photo, similar to a drop-down menu. They give visitors a way to easily take a specific action, such as follow, place an order, shop now, book now, call now, learn more, apply, sign up, or send an email.
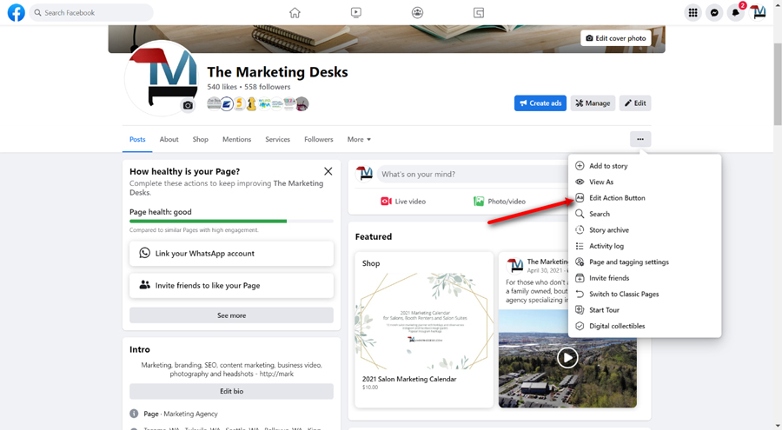
How to change the CTA button on a Facebook business page
To change the call-to-action button for your business account, click on the three dots at the right side of the page, then click on “Edit action button.” Next, click on Change Button, then select which action you want your visitors to take, and follow the prompts to complete the setup. Here are the types of CTA buttons you can add to your Facebook business page, broken into three categories.
Help people support you:
- Book Now
- Sign Up
- Start Order
- View Shop
- Get Tickets
Get people to contact you:
- Send Message
- Send WhatsApp Message
- Call Now
- Send Email
- Contact Us
Link to your group or app:
- Learn More
- Watch Now
- Visit Group
- Play Game
- Buy Now
- Reserve
Including relevant CTA buttons can help you generate more leads, and consequently, increase sales. For example, a real estate agent, legal professional, or financial professional might want to use the “Reserve” call to action button and redirect prospects to an appointment booking tool. An ecommerce business might prefer to use the “Shop Now” button, whereas a nonprofit might add the “Learn More” button to get readers to the next step or “Watch Now” to redirect viewers to an informational video.
Set Up Integrations
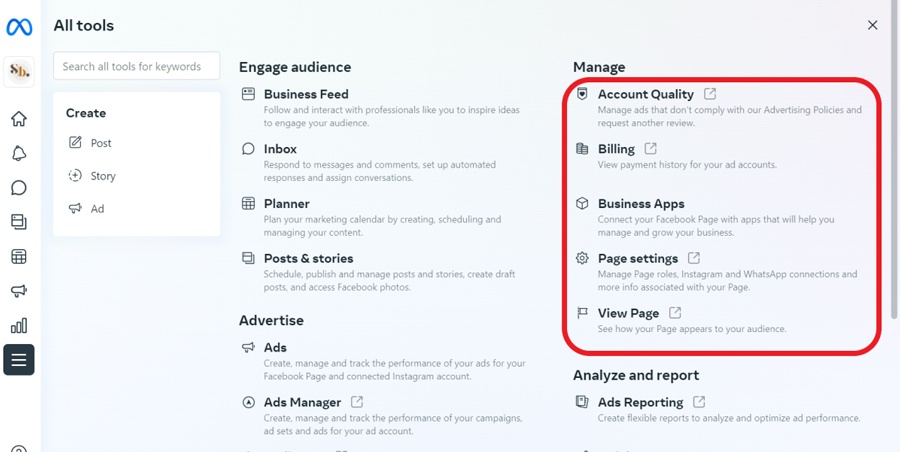
Shortcut: Go to Manage > Select “Business Apps” from the left side menu
Give page visitors more ways to engage with your business through integrations. This could be anything from connecting your customer relationship management system (CRM) for lead generation, email marketing list building through platforms like Mailchimp, or setting up social shopping by integrating your online store using Shopify, Magento, or BigCommerce.
An easy way to integrate apps is to click on Manage, then Business Apps in the left side menu. There, you’ll find quick integrations for appointment scheduling tools, ecommerce platforms, reservations, online ordering, and more. To see which apps are integrated with your page, click on Linked Accounts in the left-side menu.
List of business apps that can be integrated into a Facebook business page
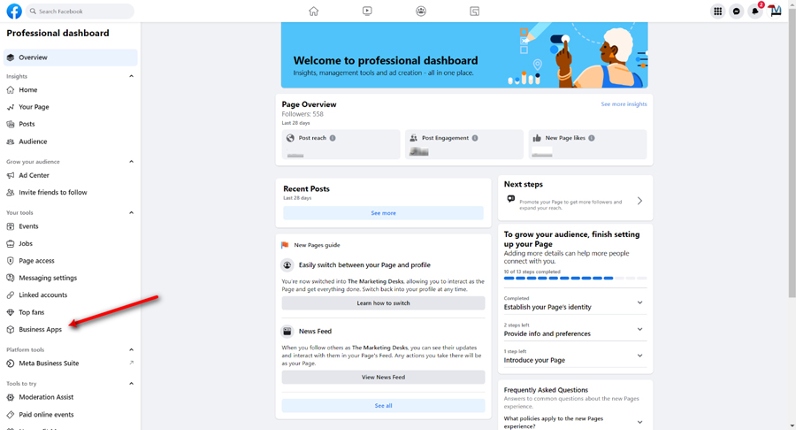
How to integrate business apps with your Facebook page
Check out the full list of Facebook business partner integrations to learn how to install these business tools on your business page.
Link Your Instagram Account
Shortcut: Click on “Linked Accounts” > Connect account
Facebook’s Meta Business Suite allows business page managers to centralize Facebook, Instagram, and other messaging tools in one place for free. To link your Instagram account to your Facebook business page, click on “Manage” and then select Linked Accounts from the left side menu of the page.
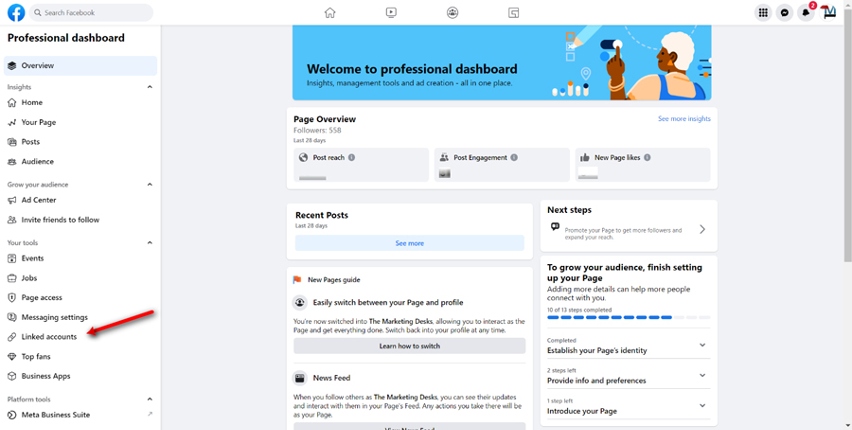
From there, click on the blue Connect account button and follow the prompts to link your pages. Once that’s done, you’ll be able to automatically post to Instagram every time you post to Facebook, or post to Instagram manually from the interface.
Manage Sections (Formerly Customize Tabs)
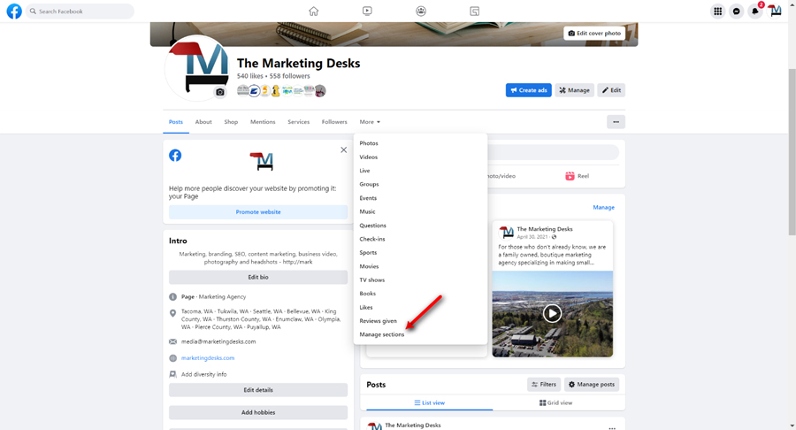
Shortcut: Click “More” > “Manage Sections”
Facebook business pages can be customized to include different sections (formerly referred to as tabs). You can also change tabs in bulk by switching to a different Facebook page template. You can configure which tabs are displayed by changing your business page’s template or editing tabs individually.
To edit the sections displayed on your page, from your Facebook business page, click on “More” and then on “Manage sections.” Note that you can uncheck or check many options, but that some cannot be deselected as Facebook has deemed them universal to business pages.
Customizable sections for a business page
Tabs are the sections on a page that give you the ability to organize and share photos, videos, announcements, and other engaging content about your business. They also provide page visitors with more ways to engage with your business, such as leaving a rave review or joining a group. For detailed information and the latest templates and tabs, refer to Facebook’s instructions for managing tabs.
Add Page Users & Configure Advanced Settings
To access Facebook’s more advanced settings for businesses, you have to use the Meta Business Suite tool. For example, multiple people may need access to your page, such as a social media coordinator responsible for publishing posts and a community manager who moderates your Facebook group. Advanced settings will allow you to give other Facebook profiles access to the page.
You can also do other things like configure messaging settings, connect WhatsApp, or even sell event tickets. While not all options will be relevant to every business (and their goal of using Facebook), it’s worth familiarizing yourself with the available options to find those that suit your business, goals, and audience.
6. Publish & Promote Your Business Page
Once you’ve created your new Facebook business page, it’s time to publish and promote it. To publish your page, you’ll first need to confirm your Facebook business account via email or mobile phone number.
Once published, there are several ways to get your business page visible online. To start, invite the people in your personal Facebook friend list to “Like” your new page. This will help you immediately acquire an audience. You also need to be consistently active on Facebook to effectively promote your page, grow an audience, and market your business.
You can promote your page in a number of different ways, and for maximum benefit, you’ll want to use them in combination:
- Invite followers of your other social accounts (e.g., Twitter, Instagram, Pinterest, and so on) to “Like” your Facebook page
- Send an email inviting your contact list to “Like” your page
- Publish a new post on a regular basis, such as once a day or at least once a week
- For every overtly promotional post, share three to four non-promotional posts with share-worthy content or content that invites engagement, such as questions, polls, or contests
- Link to your social profiles on your business website
- Add it as a social link in your professional email signature
- Connect your Instagram account (or create one and link them)
- Link it to your Google Business Page
- Add a link to your Facebook business page on all of your online business directory profiles (e.g., Yelp, Angi, industry directories, trade show listings, and more)
- Join and engage with relevant groups and individuals on Facebook
The Serial Seller Parting Ways
While it’s easy to learn how to create a Facebook business account, it can be a challenge to use it effectively as a marketing tool. For more ways to promote your business on this platform, read our list of Facebook marketing strategies for small businesses. Or, for affordable expert help, turn to a social media marketing company like The Serial Seller. From strategy to implementation, We have the expertise to help you set up a business page on Facebook and use it to grow your business.
If you do want our help, Book A Call With Us Now!
About us and this blog
We are a Full-Service Sales & Marketing provider that aims to help small to medium businesses increase their leads and sales while helping remove the business owners from their day-to-day activities so they can focus more on the long-term goals of their business.
Book a Meeting with us!
We offer Done-For-You Sales, Sales Coaching, and Advisory as well as Digital Marketing Services. If you want to increase the leads generated for your business and need some guidance and accountability, book a call with us now.